
Learn how to plant purple shamrock bulbs with confidence! This beginner‑friendly guide covers timing, depth, orientation, and soil prep for lush, vibrant growth.
Perfect for gardeners wanting beautiful Oxalis displays.
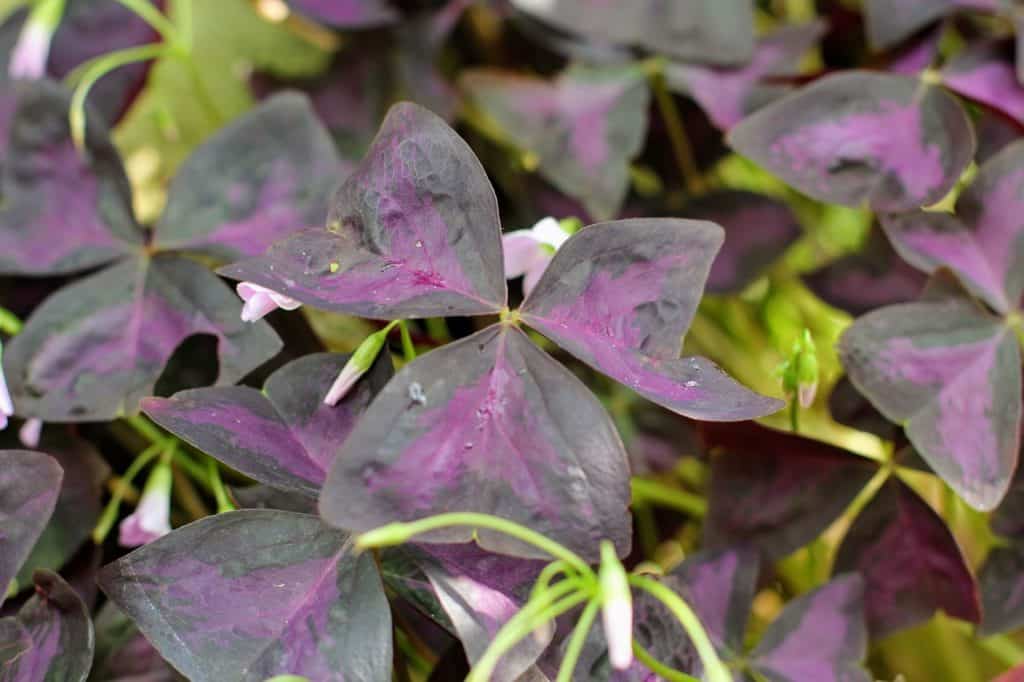
Why Purple Shamrock Bulbs?
Discuss what makes Oxalis special:
- Eye‑catching trifoliate purple leaves and delicate flowers
- Great for containers, indoor accents, or garden beds
- Grows from bulbs (“corms”), making it easy for beginners
When to Plant Bulbs
- Best in spring, after frost, lining up with natural spring growth.
- Planting in spring encourages robust foliage in 3–4 weeks and blooms in 8–10 weeks.
Choosing Healthy Bulbs
- Bulbs are actually corms, look for firm, plump, and undamaged specimens
- Avoid shriveled, moldy, or leaking corms
How to Prepare Your Planting Area
Soil & Drainage
- Use well‑draining soil, add perlite, peat, or coco‑coir for aeration.
- Bulbs dislike soggy conditions and prefer slightly moist, organic soil.
Light Requirements
- Prefers bright, indirect light or partial sun (~4+ hours daily).
- Indoors: sunny windowsill; outdoors: morning or late afternoon sun with midday shade
Container vs. Garden Planting
- Outdoors: Choose well‑drained garden bed; space bulbs 3–4″ apart, even 1–1½″ deep
- Containers: Use pots with drainage; fill ¾ with mix, settle soil with water, place bulbs, then top with another 1–2″ of soil
- Emphasize drainage importance for both settings
Planting Bulbs Vertically with the Pointed Side Up
Always plant purple shamrock bulbs with the pointed side facing up. This ensures leaves emerge correctly and roots grow downward.
Planting the bulbs upside down can delay growth or cause weak, deformed plants, so orientation is key for healthy shamrock development.
Understanding Bulb Orientation
Purple shamrock “bulbs” are technically corms, which are rounded or oval with one slightly pointed end. This pointed side is where the shoots emerge. Correct orientation affects how quickly and strongly your plant establishes.
Identifying the Top and Bottom of the Corm
- Top (Pointed End): This is the side where stems and leaves emerge. It’s sometimes a little spiky or dimpled.
- Bottom (Flat or Rounded Base): Root hairs or nubs may be visible here, that’s the part that should sit downward.
💡 Tip: If you’re unsure, plant the corms on their side. Oxalis is resilient and will usually self-correct, though upward planting is always best.
Common Mistakes to Avoid
- Planting upside down: Roots may still grow, but leaves take longer or may not emerge.
- Pushing bulbs too deep while adjusting orientation: Keep that 1–1.5″ depth consistent.
Visual Tip: How to Spot the Top of the Bulb
| Feature | Top (Upward) | Bottom (Downward) |
| Shape | Pointed or dimpled | Rounded or flat |
| Texture | Smooth or slightly rough | May have root stubs |
| Growth Indicators | Tiny central bud or eye | Little to no visible growth tip |
Final Orientation Checklist
✅ Pointed side up
✅ 1–1.5 inches deep
✅ Gently covered with soil and firmed
✅ Watered lightly to settle
Getting orientation right sets the stage for fast sprouting and stunning foliage. Up next, we’ll explore the watering schedule after planting shamrock bulbs, a key step for consistent growth.
Watering Schedule After Planting Shamrock Bulbs
Water your purple shamrock bulbs lightly after planting, just enough to moisten the soil. Keep the soil evenly moist but never soggy, until sprouts emerge.
Overwatering is a common mistake that leads to rot, so follow a careful watering routine for healthy growth.
The Importance of Proper Watering
Water is essential to activate the corms and start root development, but too much too soon can cause rot. Unlike thirsty tropicals, purple shamrock prefers a careful balance of moisture, especially before and after sprouting.
Watering Immediately After Planting
- After covering your bulbs, lightly water the soil until just damp.
- This helps remove air pockets and initiates root activity.
- Do not soak the soil, overwatering can lead to bulb rot before the plant even gets started.
Watering Through the First 2–3 Weeks
- Frequency: Water once every 4–5 days if soil dries out; adjust based on humidity and pot size.
- Check Moisture: Stick a finger into the soil, if the top 1 inch is dry, it’s time to water.
- Drainage Reminder: Always ensure the pot or garden bed drains well.
Visual Aid: Watering Schedule Timeline
| Week | Watering Frequency | Goal |
| Week 1 | Light watering after planting | Settle soil, activate roots |
| Week 2–3 | Every 4–5 days as needed | Support sprout development |
| After Sprouts | Maintain evenly moist soil | Encourage healthy growth |
Common Watering Mistakes to Avoid
🚫 Overwatering: Most common mistake; bulbs will rot if soil stays soggy.
🚫 Letting Soil Bone Dry: Can slow growth or prevent sprouting.
✅ Balanced Moisture: The goal is lightly damp, not wet, not dry.
Pro Tip for Beginners
Use a spray bottle to mist soil during early days indoors. This prevents flooding delicate corms and keeps moisture levels gentle and even.
Sunlight Requirements for Purple Shamrock Growth
Purple shamrock plants thrive in bright, indirect sunlight. Indoors, place them near a sunny window; outdoors, choose partial sun with afternoon shade.
Too much direct sun can scorch the leaves, while too little light may cause leggy, faded growth. Balance is key for bold color and health.
Why Light Matters for Purple Shamrocks
Light directly influences the intensity of your purple shamrock’s leaf color and flowering frequency.
These plants love brightness but don’t enjoy harsh midday rays, especially outdoors. Getting light right helps your shamrock stay compact, richly colored, and full of blooms.
Best Indoor Lighting Conditions
- Bright, indirect sunlight is ideal, think east or north-facing windows.
- West or south-facing windows are fine with sheer curtains to filter strong rays.
- Avoid low-light corners or north windows in winter, which may cause leaves to stretch and fade.
Pro Tip: Rotate your pot weekly for even growth.
Best Outdoor Lighting Conditions
- Outdoors, place in partial sun or dappled shade, they love morning sun but not the scorching afternoon.
- Under a tree canopy, patio, or east-facing spot works great.
- Too much direct sun = leaf burn; too little = slow, sparse growth.
Visual Aid: Ideal Light Levels for Oxalis Triangularis
| Location | Light Type | Result |
| Indoors (East Window) | Bright indirect light | Deep purple foliage, compact growth |
| Outdoors (AM Sun) | Partial sun, afternoon shade | Flowering & lush foliage |
| Low Light Corner | Insufficient light | Pale, leggy growth |
| Direct Harsh Sunlight | Too much sun | Scorched or curling leaves |
Light Tips for Beginners
✅ If leaves start to close during the day or stretch too much, increase brightness.
✅ Use a grow light if natural light is limited indoors.
✅ Purple shamrock leaves may close at night or in dim settings, don’t worry, it’s natural!
Fertilizing and General Care While Growing
Feed your purple shamrock monthly during its growing season with a balanced liquid fertilizer.
Combine this with regular watering, clean leaves, and repotting when needed for a thriving plant. Proper care ensures vibrant color, strong blooms, and long-lasting beauty indoors or outdoors.
Fertilizing Your Purple Shamrock
Purple shamrocks (Oxalis triangularis) are low-maintenance but do appreciate a nutritional boost during active growth from early spring through fall.
Best Fertilizer Type
- Use a balanced, water-soluble fertilizer, ideally 10-10-10 or 20-20-20 NPK.
- Dilute to half strength to avoid burning the delicate roots.
- Avoid high-nitrogen formulas, which can cause excessive foliage with fewer blooms.
🧪 Organic option: Use compost tea or diluted fish emulsion monthly for a gentle, natural feed.
Fertilizer Schedule
| Growth Stage | Frequency | Notes |
| Spring – Fall | Once per month | Active growth = ideal fertilizing time |
| Winter/Dormancy | None | Stop feeding; plant is resting |
General Care Tips
Cleaning and Maintenance
- Wipe dust from leaves to aid photosynthesis.
- Remove any yellowing or dead leaves at the base.
- Trim flower stems once they fade to encourage new growth.
Repotting
- Repot every 1–2 years when bulbs crowd the pot.
- Best done during dormancy, late fall to early winter.
- Choose a pot one size up with good drainage holes.
Troubleshooting Common Growth Issues
| Problem | Cause | Fix |
| Pale or leggy growth | Too little light | Move to brighter spot |
| Yellowing leaves | Overwatering or poor drainage | Let soil dry, improve potting mix |
| No blooms | Too much nitrogen | Switch to balanced or bloom-boost formula |
| Leaf tips browning | Low humidity or overfeeding | Mist lightly, reduce fertilizer |
Bonus Tip: Rotate for Even Growth
Give your plant a quarter turn weekly to help it grow evenly and avoid leaning toward the light.
Dormancy: What to Do When Shamrocks Die Back
Purple shamrock plants naturally go dormant during summer or winter. When the leaves die back, don’t panic!
Reduce watering, stop fertilizing, and allow the bulbs to rest in a cool, dry spot. With a little patience, they’ll bounce back in a few weeks with fresh growth.
What is Dormancy in Purple Shamrocks?
Purple shamrock bulbs (Oxalis triangularis) enter a natural dormancy cycle, where the leaves turn yellow or brown and drop off. This can happen in response to:
- Seasonal change (often late summer or winter)
- Environmental stress (like too much heat or dry conditions)
Dormancy isn’t a death sentence, it’s a reset. It allows the corms to rest and store energy for the next growth cycle.
Signs Your Plant is Going Dormant
- Leaves begin to yellow and wilt
- Flowering stops
- Entire plant may look like it’s “dying”
🟣 Don’t toss it out! It’s just sleeping.
What to Do During Dormancy
Step-by-Step Dormancy Care
- Stop fertilizing immediately.
- Reduce watering, only moisten the soil every 2–3 weeks if it becomes bone dry.
- Trim back all dead foliage to just above the soil line.
- Move the pot to a cool, dry location (around 50–60°F or 10–15°C).
- Leave undisturbed for 4–6 weeks.
When and How to Resume Care
- After 4–8 weeks, you may notice new growth poking through.
- Resume light watering, then introduce fertilizer after a few weeks of active growth.
- Move the plant back into bright, indirect light.
🌱 Pro tip: Repotting is best done during dormancy if bulbs are overcrowded.
Visual Aid: Dormancy Care Timeline
| Dormancy Phase | Action | Frequency |
| Onset | Stop feeding, reduce watering | Immediately |
| Mid-dormancy | Keep soil barely moist | Every 2–3 weeks |
| End of dormancy | Resume light watering | When growth appears |
| Post-dormancy | Move to light, feed monthly | As growth resumes |
Propagating by Division: Multiplying Your Purple Shamrocks
Propagate purple shamrock bulbs by dividing their corms during dormancy. Carefully separate healthy bulb clusters and replant them in fresh soil.
This easy method allows gardeners to grow new shamrocks, share with friends, or rejuvenate an old plant. It’s perfect for beginner propagation success.
Why Divide Purple Shamrock Bulbs?
Over time, Oxalis triangularis corms multiply underground, forming tight clusters. Dividing them:
- Refreshes overcrowded pots
- Improves airflow and growth
- Gives you free plants!
The best time to divide is during or right after the dormancy period, when the plant is already cut back and resting.
Step-by-Step Guide to Dividing Shamrock Bulbs
- Wait for dormancy. Ensure the plant has stopped growing and all foliage is cut back.
- Remove from pot or soil. Gently lift the corms and brush away excess soil.
- Separate the clumps. Break apart the corms by hand or cut them apart if needed. Each section should have several corms for best success.
- Inspect and clean. Remove any shriveled, moldy, or mushy corms. Keep only the healthy, firm ones.
- Replant. Follow the standard planting guide: 1–1.5 inches deep, spaced 3–4 inches apart, pointed side up.
- Water lightly and place in bright, indirect light. Growth should resume in 2–3 weeks.
Visual Aid: Division & Replanting at a Glance
| Step | Action | Tip |
| 1. Lift bulbs | Use fingers or small trowel | Be gentle, avoid crushing corms |
| 2. Divide clumps | Break or cut into sections | Use clean tools if cutting |
| 3. Replant | 1–1.5″ deep, spaced 3–4″ apart | Pointed side up! |
| 4. Restart care | Light watering, bright light | Expect shoots in 2–3 weeks |
Tips for Successful Propagation
✅ Propagate in spring for fastest results
✅ Use clean hands and tools to avoid fungus
✅ Label pots if you’re gifting them or experimenting with light
Dividing purple shamrocks is not only practical but incredibly satisfying, it’s one of the easiest ways for beginner gardeners to build confidence and success.
Final Thoughts
Planting purple shamrock bulbs (Oxalis triangularis) is an easy, rewarding experience, perfect for beginners.
With a little care, proper planting depth (1–1.5 in deep), pointed-side‑up orientation, regular but gentle watering, bright indirect light, monthly feeding, and mindful dormancy, you’re set for a vibrant display of purple foliage and delicate blooms that can return year after year.
Embrace its natural dormancy cycle: when leaves fade, give the bulbs a rest in a cool, dry spot, then wake them up with water and light, it’s natural and expected .
And don’t forget the joy of propagation by division, especially after dormancy. It’s a satisfying way to multiply your plants or share them with loved ones.
Above all, confidence and consistency ensure success. This guide equips you to create and maintain lush indoor pots or lively garden displays.
With attention, patience, and a sense of fun, your purple shamrocks will thrive, and may even surprise you with blooms and foliage that beautify your space year after year.