
Learn how to propagate Homalomena plants with ease using simple methods like division and stem cuttings.
Our complete guide gives you beginner-friendly, step-by-step instructions for healthy plant propagation.
What Is Homalomena and Why Propagate It?
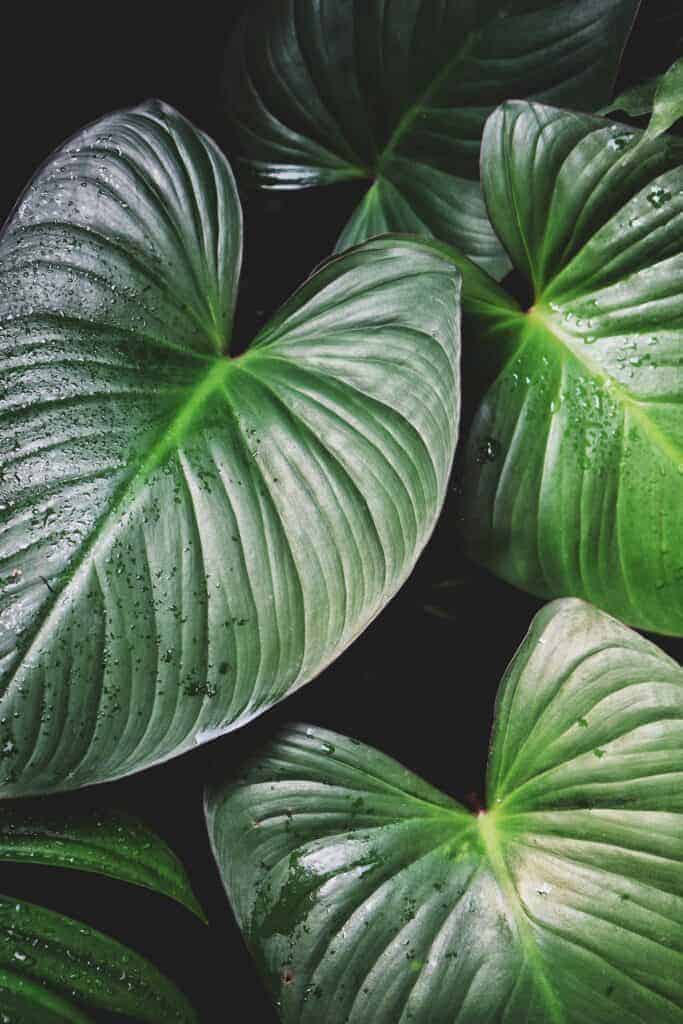
Homalomena, a lush, tropical houseplant known for its heart-shaped leaves and air-purifying qualities, is steadily becoming a favorite among plant parents.
These beauties are part of the Araceae family, cousins to Philodendrons and Anthuriums, and are especially prized for their low-maintenance care and adaptability to indoor life.
Propagation allows you to multiply your plant collection, share with fellow gardeners, or rejuvenate an aging plant, all without needing to buy a new one.
Why Beginners Love Propagating Homalomena
- Easy to Handle: Homalomena propagation is straightforward, especially through division.
- Fast Growth: Once rooted, new plants grow rapidly under the right conditions.
- Low-Risk: With the right care, most propagations succeed.
Main Propagation Methods for Homalomena
There are three commonly used methods for propagating Homalomena:
| Method | Difficulty | Best For | Time to Root |
| Division | Easy | Mature plants with multiple stems | 2–4 weeks |
| Stem Cuttings | Moderate | Compact varieties | 3–6 weeks |
| In Vitro (Tissue Culture) | Advanced | Large-scale propagation | Varies |
Division: The Easiest Method
Division is ideal for beginners. You simply separate the plant at the root level into smaller sections, each with its own root system and stems. It’s best done during repotting or when your plant outgrows its pot.
✅ Pros: Low stress, high success rate
⚠️ Cons: Only works on mature plants with multiple stems
Stem Cuttings: A Bit More Advanced
Cuttings involve snipping a healthy stem and encouraging it to grow new roots in water or soil. This method is more delicate but can be rewarding for gardeners looking to experiment or if your plant lacks multiple stems.
✅ Pros: Good for bushier growth
⚠️ Cons: Requires rooting hormones and more patience
In Vitro Propagation: For the Pros
This method involves lab-grade precision, sterile environments, and nutrient-rich gels. It’s typically used in nurseries or research settings and not recommended for casual home growers.
✅ Pros: Scales propagation quickly
⚠️ Cons: Requires equipment, not beginner-friendly
Best Time to Propagate Homalomena
Spring and early summer are the prime windows for propagation. The plant’s natural growth phase ensures quicker rooting and less shock. Avoid winter, when growth slows and success rates dip.
Beginner Tips for Success
- Use sterilized tools: Avoid introducing bacteria or fungi.
- Choose healthy parent plants: Look for lush leaves and firm stems.
- Be patient: Rooting takes time, don’t rush or overwater.
Propagating Homalomena Through Division: Step-by-Step Instructions
Learn how to propagate Homalomena using the division method. This step-by-step guide helps beginners multiply their plants successfully with minimal tools and maximum results.
Why Division Works Best for Beginners
Division is the most straightforward way to propagate Homalomena. It doesn’t require any special equipment, rooting hormones, or advanced skills.
As long as your plant has a few healthy stems and a well-developed root system, you’re ready to get started.
This method mimics how Homalomena spreads in nature, by slowly forming clusters of growth that can be separated and planted independently.
When to Divide Homalomena
The ideal time for dividing Homalomena is:
- Spring or early summer: When the plant is actively growing and can bounce back faster.
- During repotting: Killing two birds with one trowel, you refresh the soil and get new plants in the process.
What You’ll Need
| Tool/Supply | Purpose |
| Clean pruning shears | To separate stems and roots cleanly |
| Gloves | Protects your hands from irritants |
| New pots with drainage | For replanting divisions |
| Fresh potting mix | Aroid or peat-based mix preferred |
| Watering can or spray bottle | To hydrate after transplant |
Step-by-Step Guide to Dividing Homalomena
Step 1: Water Your Plant the Day Before
Give your Homalomena a deep watering a day before dividing. This softens the soil, making it easier to work with and less stressful for the roots.
Step 2: Gently Remove the Plant from Its Pot
Turn the pot sideways, support the plant at the base, and gently wiggle it out. Be patient—don’t yank it.
Step 3: Loosen the Root Ball
Shake off excess soil to expose the roots. Use your fingers to untangle them gently.
Step 4: Identify Natural Divisions
Look for clumps or sections that have their own roots and leaves. Homalomena often grows in small clusters that naturally separate with a bit of coaxing.
Step 5: Separate with Care
Using clean shears or a sterilized knife, cut or pull apart the sections. Ensure each division has:
- At least 2–3 leaves
- A healthy portion of root
✅ Pro Tip: Dip your tool in a 10% bleach solution or rubbing alcohol to prevent disease transmission.
Step 6: Repot Immediately
Place each division into its own pot filled with fresh, moist potting mix. Gently press down the soil around the base.
Step 7: Water Lightly and Keep in Bright, Indirect Light
Water just enough to settle the soil, don’t drench it. Then, place your new pots in a warm, shaded area with filtered sunlight.
Aftercare Tips for Newly Divided Plants
| Care Factor | Recommendation |
| Watering | Keep slightly moist, not soggy |
| Humidity | 50–70% is ideal |
| Temperature | 70–85°F (21–29°C) |
| Fertilizer | Wait 4–6 weeks, then use diluted feed |
Avoid stressing your new plants for the first couple of weeks. No repotting, no direct sun, and no fertilizing right away.
Common Mistakes to Avoid
- Overwatering: A top killer of new divisions.
- Dividing too small: Ensure each section is robust enough to survive.
- Ignoring sanitation: Dirty tools can spread fungal infections.
What to Expect in the Coming Weeks
Within 2–4 weeks, you’ll notice new growth if conditions are right. Once new leaves start unfurling, your plant has officially rooted and is ready to grow.
Mastering Stem Cuttings: Propagate Homalomena Successfully
Discover how to propagate Homalomena using stem cuttings with this clear, step-by-step guide. Learn the best practices, tools, and conditions to root healthy new plants from cuttings.
Is Stem Cutting Right for You?
While not as foolproof as division, stem cutting offers a rewarding way to grow new Homalomena plants, especially if your plant doesn’t have many root clumps or if you’re up for a slightly more hands-on propagation method.
This technique involves taking a portion of the plant’s stem and encouraging it to root, either in water or soil. While it requires more patience and care, it’s perfect for gardeners who love the propagation process and watching new life unfold.
What Homalomena Varieties Respond Well to Stem Cutting?
Most species can be propagated through stem cuttings, but the following varieties are known to be particularly receptive:
| Homalomena Variety | Cutting Success Rate | Best Rooting Method |
| Homalomena rubescens | High | Water or soil |
| Homalomena ‘Emerald Gem’ | High | Water |
| Homalomena wallisii | Medium | Soil |
Materials You’ll Need
| Item | Purpose |
| Sharp pruning shears | To make clean cuts |
| Rooting hormone (optional) | Stimulates faster root growth |
| Glass jar or small pot | For rooting in water or soil |
| Clean water or fresh potting mix | Rooting medium |
| Plastic bag or humidity dome | To retain moisture (optional but helpful) |
How to Take a Successful Homalomena Cutting
Step 1: Select the Right Stem
Choose a healthy, mature stem that:
- Is about 4–6 inches long
- Has at least one node (the bumpy part where roots grow)
- Includes a couple of leaves for photosynthesis
🌿 Pro Tip: Avoid stems with flowers or buds, they sap energy needed for root formation.
Step 2: Make the Cut
- Use sterilized pruning shears to snip just below a node.
- Remove the lower leaves, leaving only 1–2 at the top.
- Optionally, dip the cut end into rooting hormone powder or gel.
Step 3: Choose Your Rooting Method
| Water Rooting | Soil Rooting |
| Place cutting in a clear jar with room-temp water | Insert directly into moist potting mix |
| Change water every 3–4 days | Keep the soil lightly damp, not soggy |
| Roots visible in 2–4 weeks | Roots form in 3–6 weeks (not visible externally) |
💡 Keep the container in bright, indirect light and maintain warmth (70–80°F).
Caring for Cuttings While They Root
- Humidity: Covering the cutting with a plastic bag can boost humidity and encourage faster rooting.
- Avoid direct sun: It can scorch tender cuttings.
- Be patient: Rooting is a slow process, don’t panic if there’s no growth for a few weeks.
Transplanting Your Rooted Cutting
Once roots are 1–2 inches long (or after 4–6 weeks in soil), transplant your new plant into a pot with a well-draining aroid mix. Water gently and let it acclimate to its new environment.
Common Issues and How to Fix Them
| Issue | Cause | Solution |
| Leaves turning yellow | Overwatering or rot | Cut back watering, check drainage |
| No root growth after 6 weeks | Low temperature or low light | Move to a warmer, brighter area |
| Cutting turns mushy | Fungal infection or dirty tools | Start fresh with sterilized tools |
When to Celebrate Success
Signs that your cutting has rooted and is thriving:
- New leaf growth
- Firm resistance when you tug gently
- Visible roots (for water method)
Congrats, you’ve just grown a new Homalomena from scratch!
Common Problems in Homalomena Propagation and How to Fix Them
Troubleshoot the most common issues faced when propagating Homalomena and learn how to resolve them with these helpful tips.
1. Yellowing Leaves: Causes and Solutions
Problem: Yellowing leaves are a common sign that something isn’t quite right. Whether the plant is a cutting or a newly divided specimen, yellow leaves signal stress or environmental imbalances.
Causes:
- Overwatering: One of the most common culprits. Too much water can drown the roots and cause the leaves to yellow.
- Underwatering: On the flip side, if the soil is too dry, the plant may exhibit yellow leaves as it starts to dry out.
- Too much direct sunlight: Homalomena’s sensitive leaves can scorch if exposed to harsh, direct sunlight, leading to yellowing.
- Nutrient Deficiency: A lack of essential nutrients, especially nitrogen, can cause yellowing.
Solutions:
- Watering: Check the soil moisture and ensure the plant isn’t sitting in waterlogged soil. Always allow the top 1–2 inches to dry out before watering again.
- Move to Indirect Light: Place the plant in a brighter, indirect light source, away from direct sun.
- Fertilize: Use a diluted liquid fertilizer once the plant is well-established to replenish any nutrients.
🌱 Pro Tip: If you spot yellowing at the tips, it’s usually a sign of either overwatering or a lack of nutrients.
2. Root Rot: What It Is and How to Prevent It
Problem: Root rot is a serious issue that can quickly kill your Homalomena if left unchecked. It typically occurs when roots are left sitting in waterlogged soil without proper drainage.
Causes:
- Excessive Watering: When water doesn’t drain properly, it stagnates and causes the roots to rot.
- Poor Drainage: Using soil that doesn’t allow enough air circulation can trap moisture, which suffocates the roots.
Solutions:
- Repot the Plant: If you suspect root rot, remove the plant from the pot and inspect the roots. Cut off any mushy or discolored roots with sterilized shears. Replant in fresh, well-draining soil.
- Use Pots with Drainage Holes: Always ensure your pots have drainage holes to allow excess water to escape.
- Water Correctly: Wait until the top of the soil feels dry to the touch before watering. A moisture meter can help you gauge when it’s time to water.
💡 Pro Tip: Consider using a pot with more drainage holes or mixing more perlite into the soil to improve drainage.
3. Leaf Curling or Wilting: Symptoms of Stress
Problem: If your Homalomena’s leaves are curling or wilting, it’s often a sign that the plant is experiencing some form of stress.
Causes:
- Low Humidity: As a tropical plant, Homalomena thrives in high humidity. If the air is too dry, the leaves may curl or wilt.
- Too Much or Too Little Watering: Both overwatering and underwatering can cause leaves to lose their turgidity and curl.
- Extreme Temperature Fluctuations: Sudden drops or rises in temperature can cause the plant to go into shock, leading to leaf stress.
Solutions:
- Increase Humidity: Place the plant in a more humid area or use a humidity tray or dome. Misting the plant lightly can also help.
- Adjust Watering Schedule: Check if the soil is too dry or soggy. Water the plant only when the top layer feels dry to the touch, but avoid letting it dry out completely.
- Stable Temperature: Ensure that the plant isn’t exposed to drafts, direct heat sources, or cold spots in your home.
🌿 Pro Tip: If your plant is in a dry environment, increase humidity using a humidifier, especially during the winter months when indoor air is drier.
4. No Root Growth: Why Your Cuttings Aren’t Rooting
Problem: Sometimes, your Homalomena cuttings may show no signs of root growth, despite weeks of waiting. This can be incredibly frustrating.
Causes:
- Low Temperature: If your cuttings are kept in an area that’s too cool, root development can slow or stall.
- Inadequate Light: Without enough light, cuttings may struggle to produce roots.
- Too Much Water: Constantly wet conditions can drown the cutting before it has a chance to develop roots.
Solutions:
- Increase Temperature: Keep the cuttings in a warm location, ideally between 75°F–80°F (24°C–27°C). A seed heating mat can help maintain consistent warmth.
- Provide Adequate Light: Place the cutting in bright, indirect light, but avoid direct sun, which can scorch the cutting.
- Avoid Overwatering: Ensure the cutting is in well-draining soil or water and only water it when the medium feels slightly dry to the touch.
🌞 Pro Tip: Be patient! Rooting can take anywhere from 2 to 6 weeks, depending on conditions and the method you use. Keep conditions optimal and give it time.
5. Fungal Growth: How to Spot and Treat It
Problem: Fungal growth can appear as white mold or fuzzy patches on the surface of the soil, around the base of the cutting, or on the leaves.
Causes:
- High Humidity with Poor Air Circulation: This creates a perfect environment for mold and fungi to thrive.
- Overwatering: Fungus loves moisture, and overly wet conditions can promote fungal growth.
Solutions:
- Increase Air Circulation: Open the propagation area to more airflow or use a small fan.
- Reduce Humidity: If you’re using a humidity dome, take it off for a few hours each day to allow the cutting to dry out.
- Fungicide: If you spot mold, treat the plant with an organic fungicide or a mixture of water and cinnamon, which can help control fungal growth.
🦠 Pro Tip: Always sterilize your tools and containers before use to prevent fungal spores from spreading.
When to Try Again
If the issues persist or your cuttings still aren’t rooting after multiple attempts, it might be time to start fresh.
Clean your pots, freshen up your potting mix, and try a new cutting. Sometimes it’s simply a matter of timing and environmental factors.
Final Thoughts: Your Homalomena Propagation Journey
Embarking on the journey of propagating Homalomena is a rewarding endeavor that allows you to expand your plant collection and deepen your connection with nature.
With the right knowledge and care, you can successfully propagate these beautiful tropical plants.
Embrace the Process
Propagation is not just about multiplying plants; it’s about understanding and nurturing life.
Whether you’re starting with stem cuttings or divisions, each method offers unique insights into plant growth and resilience. Remember, patience and observation are your best tools.
Stay Informed and Adapt
As you progress, continue to educate yourself about Homalomena care. Conditions like humidity, light, and temperature play crucial roles in the success of your propagation efforts.
Stay adaptable and adjust your methods as you learn more about your plants’ needs.
Celebrate Your Successes
Every new leaf and rooted cutting is a testament to your dedication and care.
Celebrate these milestones, and don’t hesitate to share your experiences with fellow plant enthusiasts. Community and shared knowledge enrich the gardening experience.
Looking Ahead
As your propagated Homalomena plants mature, consider experimenting with different varieties or exploring advanced techniques like tissue culture.
The world of plant propagation is vast and full of possibilities, offering endless opportunities for growth and discovery.
“With a little patience, the right care, and a touch of green-thumb magic, you’ll soon have thriving Homalomena plants to enjoy and share. Happy propagating, and may your garden flourish with every rooted cutting!”