
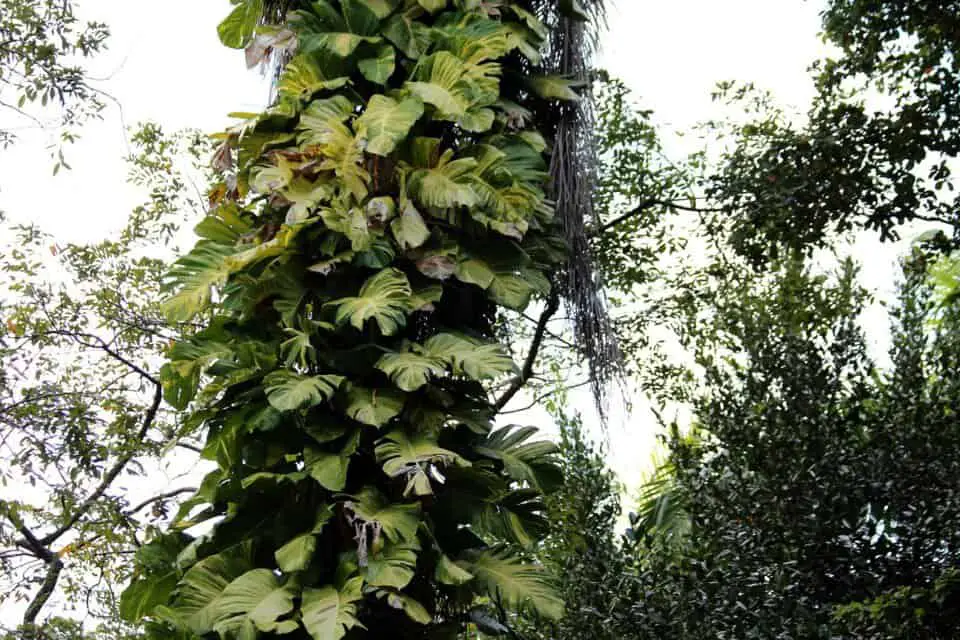
| Quick answer Train a Monstera to climb by giving it a moss pole, coir pole, or trellis to attach to, tying the stems in loosely as it grows, and keeping the pole consistently moist so the aerial roots take hold. Rotate the plant toward its light source occasionally and prune away growth heading in the wrong direction. Most Monsteras take four to twelve weeks to properly grip a new support. |
If you want to train a Monstera to climb rather than trail, the good news is that this is exactly what the plant is built to do.
In the wild, Monstera deliciosa spends its early life crawling across the rainforest floor before finding a tree trunk and climbing toward the canopy, using thick aerial roots to anchor itself as it goes.
Recreating that support indoors, with a moss pole, coir pole, or trellis, is what encourages the upright, architectural shape most people picture when they think of a mature Monstera, along with the larger, more deeply split leaves that come with it.
This guide works through every method of training a Monstera to climb, the mechanics of why each one works, the mistakes that most commonly go wrong, and the one risk that most care guides skip over entirely.
Large Monsteras, unlike upright, tree-shaped houseplants such as the fiddle-leaf fig or rubber plant, naturally sprawl outward rather than up.
Left without support, a mature plant can quickly take over far more floor and shelf space than most rooms can spare.
Giving it something to climb solves that problem, and it also tends to encourage the dramatic, heavily fenestrated leaves, the lace-like holes and splits, that people grow Monsteras for in the first place, since larger fenestrations are associated with the plant’s mature, climbing growth phase rather than its juvenile, ground-crawling one.
Why Monsteras Climb in the Wild
Monstera deliciosa is what botanists call a hemiepiphyte: a plant that starts life rooted in soil, then transitions to growing as a climber that clings to trees using aerial roots rather than depending solely on its soil roots.
The RHS notes that alongside the roots it sends into the ground, the plant produces stem roots that attach onto host trees, and these are what give it the physical support to climb toward better light.
This matters for how you train the plant indoors, because a pole or trellis is not decoration. It is a stand-in for the tree trunk the plant would naturally be attaching to.
Without one, the plant has nothing to grip, so it grows outward along the ground or the nearest surface instead, using energy on stem length rather than leaf size.
Is Your Monstera Ready for Support?
Young Monstera deliciosa typically grows on a few upright stems at first, but as the plant ages and its stems get heavier, it tends to flop and spread horizontally rather than continuing upward on its own.
New owners are often caught out by how quickly a once-vertical plant starts sprawling; if you are noticing your Monstera’s stems bending or drooping under their own weight rather than standing up, that is usually the clearest sign it is ready for support.
A second sign is the appearance of aerial roots along the stem, since these are the structures the plant will use to grip a pole once one is available, and their presence means the plant is actively looking for something to climb.
It is easiest to add a support while the plant is still relatively young and pliable, since older stems that have already set into a horizontal, woody habit are more reluctant to be trained upright and are more prone to snapping if bent too far.
This applies a little differently to smaller Monstera relatives: Monstera peru has a much more compact, less climbing-driven habit than deliciosa, so treat any advice written for the larger species as a loose guide rather than an exact match if that is what you are growing.
Choosing the Right Support for Your Monstera
The right support depends less on personal taste and more on the size, age, and growth habit of the specific plant in front of you.
Use the table below to narrow down the best starting point before you buy anything.
| Your situation | Best support | Why |
| Young plant, one or two thin stems | Bamboo stake | Lightweight support is enough while stems are still flexible and light; a moss pole is unnecessary bulk this early. |
| Established plant with visible aerial roots | Moss pole or coir pole | Aerial roots need a moist surface to grip; bamboo alone gives no moisture for them to attach to. |
| Large, heavy specimen with multiple stems | Wide-based trellis | Spreads the load across several attachment points rather than one central pole, reducing strain on any single stem. |
| You dislike the look of a pole | Wall-mounted trellis or frame | Achieves the same support function while keeping the structure visually integrated into the room. |
| Plant is already sprawling badly | Prune first, then stake | Removing badly misdirected growth before adding support gives the plant a cleaner shape to train from. |
The Main Ways to Train a Monstera to Climb
There is no single correct method here. Most established Monsteras end up trained using a combination of a physical support, occasional pruning, and light management.
Each approach works through a different mechanism, and understanding why each one works makes it much easier to tell when something is going wrong versus when it just needs more time.
Moss Poles and Coir Poles
A moss pole is a vertical stake wrapped in sphagnum moss, while a coir pole uses coconut husk fibre wrapped around a wooden core; both work on the same principle.
Aerial roots only attach to a surface that stays consistently damp, because the root tissue needs sustained moisture contact to trigger the growth response that makes it cling and thicken against a surface, rather than simply dangling in the air.
This is why keeping the pole misted regularly matters so much more than most people expect: a pole that dries out between waterings gives the roots no reason to attach, and they will simply hang there doing nothing.
Position the pole close to the base of the main stem and push it firmly enough into the compost that it does not wobble, since a loose pole shifts every time the plant is touched and disrupts the roots that are trying to establish a grip.
| Tip: telling attachment from rejection A common worry is that the plant is ‘rejecting’ the pole because the aerial roots are not visibly gripping it after a few weeks. Before assuming that, check whether the moss is genuinely damp an inch or two below the surface, not just on top; most apparent rejection is really just an under-misted pole. Give it four to six weeks of consistent moisture before concluding the plant needs a different support. |
Staking with Bamboo or Wooden Stakes
A plain bamboo stake works well for younger plants that do not yet have the aerial roots needed to grip a moss pole, since it relies entirely on ties rather than root attachment.
Find the heaviest, most substantial stems near the base of the plant, since these carry the most weight and benefit most from support, then dig a small hole with a trowel and insert the stake firmly enough that it does not lean.
Start your first tie roughly 2.5 to 5cm (1 to 2in) above where the stem meets the soil, then repeat ties every 8 to 20cm (3 to 8in) up the stem depending on the size of your plant.
The mechanism that matters here is tension, not the material of the tie itself: a tie that is too tight physically constricts the stem’s vascular tissue, the pathways carrying water and nutrients up and down the plant, which can girdle and eventually kill everything above that point.
| Warning: check tie tension weekly A tie that fits comfortably today can become dangerously tight within two or three weeks, because the stem keeps thickening as the plant grows. Slide a finger underneath each tie roughly once a week. If it no longer moves freely, loosen and re-tie it immediately rather than waiting for a visible dent or discolouration to appear, since by that point some vascular damage has usually already been done. |
Trellis Training
A trellis works on the same attachment principle as a pole but spreads support across a wider area, which suits Monsteras that are producing several stems rather than one dominant lead.
It also lets you shape the plant’s spread deliberately, training some stems up and others sideways along the trellis frame, rather than forcing everything into a single vertical column.
If new growth is not reaching for the trellis at all, the more common explanation is insufficient light rather than a flaw in the trellis itself: a Monstera kept in low light stays in its juvenile, non-climbing growth phase for longer, which is also why its leaves may not be developing splits yet.
Distinguish the two by checking light levels before assuming the training method has failed.
A plant that is genuinely climbing-ready but simply hasn’t reached the trellis yet still shows firm, upright new growth; a plant in a true low-light stall instead produces small, pale, closely spaced leaves regardless of what it is next to.
Pruning to Redirect Growth
Rather than staking, some growers simply prune away any new growth heading in an unwanted direction, which forces the plant’s energy back into the stems left standing.
This works because new growth only emerges from nodes, the small bumps along the stem where a leaf or aerial root attaches; removing a stem just above a node redirects the plant’s hormonal growth signals to the buds at that node rather than the tip that was removed.
Always cut at a slight angle a short distance above a node, never straight across the middle of an internode, since a cut placed away from a node leaves a length of stem with no growth point that will simply die back to the nearest node anyway.
The cuttings you remove are not waste. Provided each piece includes at least one node, they can be propagated into new plants rather than discarded.
Using Light to Encourage Upright Growth
You can also use the plant’s own phototropic response, its tendency to grow toward a light source, to help train its shape.
If new leaves are consistently extending toward the window, rotating the pot so the newest growth faces away from the light encourages the plant to redirect its next leaves back toward the centre, which helps keep growth balanced around the pole rather than lopsided toward one side of the room.
This is a genuinely useful shaping tool, but it is slow and works best alongside a physical support rather than instead of one; for guidance on where in the room to position the plant in the first place, bright, indirect light gives the most even, predictable growth to train.
Attaching Your Monstera to Its Support
VELCRO plant ties are the easiest option for most people, since they grip themselves without needing a secure knot, and they release cleanly without damaging the stem when you need to adjust or remove them.
Soft twine, plant tie tape, or fabric strips all work as well, provided you avoid anything rigid or narrow enough to cut into the stem under tension.
Cable ties are sometimes used as a temporary measure to hold a stem against a pole while its aerial roots establish a grip, but they need checking even more frequently than soft ties, since they do not give at all as the stem thickens.
Whatever material you use, do not cut the plant’s aerial roots to make attaching easier; they are there to support the plant’s climbing structure, and removing them only creates more work tying stems in by hand later.
Overwatering Through the Pole: The Risk Most Guides Skip
Most advice on training a Monstera to climb focuses entirely on keeping the pole moist enough, and for good reason, since an under-misted pole is the single most common reason attachment fails.
What far fewer guides mention is that the same moist environment which encourages aerial root attachment can just as easily encourage stem and crown rot if the base of the plant, rather than just the pole, stays constantly wet.
This happens in a specific, avoidable way. Ties positioned too close to the soil line trap moisture from misting or watering against the stem tissue itself, rather than letting it evaporate; combined with a soil mix that already drains poorly, this creates a pocket of permanently damp stem tissue at exactly the point where the plant is most vulnerable.
The mechanism is straightforward once you see it: plant stem tissue that stays wet for extended periods loses access to oxygen at the cell level, and that anaerobic environment is exactly what opportunistic fungal and bacterial pathogens need to establish an infection, in much the same way waterlogged soil causes root rot below ground.
| Warning: the mistake most moss pole advice misses Several popular guides recommend pouring water directly down the pole to keep it moist, without warning that this can pool at the base where the pole meets the compost, right where the lowest ties usually sit. If you water this way, check that the base of the pole and the surrounding stem tissue are drying out between waterings, not sitting permanently sodden. Mist the upper two-thirds of the pole instead of pouring from the top if your set-up tends to pool at the base. |
The confusability trap here is genuine: a stem that is failing because of insufficient moisture shrivels and dries, going thin and slightly wrinkled, which is a very different physical sign from a stem that is failing because of excess moisture, which instead goes soft, dark, and mushy, sometimes with a distinct sour smell.
If you are seeing shrivelling rather than softening, the fix is more consistent misting, not less; shrivelled aerial roots are almost always a moisture-deficit problem, and treating them as an overwatering issue by cutting back further will only make things worse.
If you are seeing dark, soft tissue at the point where a tie sits against the stem, that is the rot pattern, and it needs the opposite response.
Managing Stem Rot from an Over-Wet Pole Setup
Act as soon as you notice softening, since this kind of rot spreads along the stem far faster than root rot spreads through soil, and a stem that rots all the way around its circumference at any point will lose everything above that cut regardless of how healthy the rest of the plant is.
Remove the tie at the affected point immediately and let the area air out fully before deciding on next steps; in mild cases, simply loosening moisture contact at that spot is enough to halt further spread.
For anything beyond the mildest surface softening, cut back to firm, healthy tissue well below the affected area using sterilised, sharp scissors or secateurs, since any rotted tissue left in place will continue to spread even after the visible damage is removed.
Treat the cut as you would any other stem wound: let it callous over in a dry, airy spot out of direct sun for a day before resuming normal misting elsewhere on the plant, and keep a closer eye on tie placement and pole moisture afterwards so the same section does not fail again.
If the rot has already reached the main stem or crown of the plant rather than a side stem, the situation is more serious, and it’s worth reading through the full process for reviving a severely declining Monstera alongside this fix.
Repositioning the lowest tie a little higher up the stem, well clear of the point where misting or run-off collects, and reviewing whether the base of the pole needs better drainage around it, prevents most repeat cases.
Pest Risk on a Permanently Damp Pole
The same consistently moist environment that helps aerial roots attach also happens to be an ideal environment for several common Monstera pests, so a climbing set-up needs slightly more vigilance than a plant with no pole at all.
Fungus gnats are the most frequent nuisance, drawn to the damp moss and compost surface, though they are largely cosmetic and rarely damage the plant itself; thrips are the more damaging risk, since they feed directly on leaf and stem tissue and can spread quickly in a humid microclimate.
A mild, slightly earthy smell from damp moss is completely normal and simply reflects the organic material breaking down slowly, which is different from the sour, sharper smell that signals rot described in the previous section.
Wiping the pole down with a diluted neem oil solution every few weeks, particularly after periods of heavy misting, is a low-effort way to keep pest pressure down without needing to treat an active infestation later.
Other Downsides Worth Knowing Before You Start
Beyond the moisture risks already covered, a poorly installed pole can physically damage roots if it is forced into the compost carelessly, and a pole pushed in at an angle can create a depression around its base where water collects instead of draining away.
Before installing any support in an established plant, it is worth checking whether the plant is root bound, since a congested root ball leaves very little room to insert a pole without damaging roots, and repotting into a slightly larger pot at the same time is often the more sensible order of operations.
Cheaper poles, particularly thin bamboo or lightweight moss tubes, can bend or snap under the weight of a large, established Monstera, which undoes months of training in a single afternoon.
Buying a pole rated for a larger plant than you currently have saves having to replace it as the plant grows into it.
| UK Reader Note Monstera deliciosa is not hardy outdoors in the UK and is grown strictly as a houseplant here, thriving at the moderate room temperatures and moderate to high humidity most UK homes already provide. The RHS notes it does well between 18 and 25°C (65 to 77°F); most centrally heated UK homes fall comfortably within that range through the colder months, though radiator-adjacent spots can dry the compost and any exposed moss faster than expected. Coir and moss poles are widely available from UK garden centres and online houseplant retailers, and either works equally well provided misting is kept consistent. |
Quick Reference: Troubleshooting Your Climbing Monstera
Use this shorter recap once you already understand the causes above and just need a fast check while working on the plant.
| What you’re seeing | Check this first | Most likely fix |
| Aerial roots not gripping the pole | Push a finger into the moss an inch down | Mist more consistently for 4-6 weeks before changing method |
| Stem is thin, wrinkled, dry | Compare to nearby healthy stem tissue | Increase misting; this is a moisture-deficit sign, not rot |
| Stem is soft, dark, or smells sour | Press gently near a tie point | Remove tie, air out, cut back to healthy tissue if softened |
| Tie feels snug against the stem | Slide a finger underneath the tie | Loosen and re-tie; check weekly as the stem thickens |
| New growth ignoring the trellis | Check light levels at that spot | Move to brighter, indirect light before retraining |
| Small flying insects around the pole | Check if damage is cosmetic or on leaf tissue | Fungus gnats: largely harmless. Thrips: treat with neem oil |
| Plant leaning heavily to one side | Check which side gets more light | Rotate pot; retie loosely; re-check in 2-3 weeks |
Frequently Asked Questions
Do I really need a moss pole for my Monstera?
Not strictly, no. A Monstera left without any support will still grow and survive, but it will sprawl outward along the ground rather than climbing upward.
It will also tend to stay in its juvenile growth phase for longer, producing smaller, less deeply fenestrated leaves than the same plant would with something to climb, because the plant reserves its most dramatic leaf growth for the climbing phase of its life cycle.
If floor space and leaf size are not a priority for you, letting it trail from a shelf or hanging basket is a perfectly valid alternative rather than a failure to care for it properly.
How long does it take for aerial roots to attach to a pole?
Most Monsteras take somewhere between four and twelve weeks to visibly grip a newly installed pole, though this varies considerably with how consistently the pole is kept moist and how many aerial roots the plant already had before you added support.
A plant with several existing aerial roots positioned close to the pole attaches faster than one that needs to grow new roots from scratch, simply because it has a head start.
Resist the urge to test grip by tugging gently on the stem in the first few weeks, since this can dislodge roots that are only just beginning to make contact.
Can I train an older, already-trailing Monstera to climb, or is it too late?
It is rarely too late, but it takes considerably more patience with a mature plant than with a young one, because established stems have often set into a horizontal habit and are stiffer and more prone to snapping if bent upright too quickly.
The more reliable approach with an older plant is to prune back the most sprawling growth first, then train the remaining, more manageable stems onto a pole gradually over several weeks rather than forcing the whole plant upright in one session.
New growth that emerges after pruning tends to follow the support far more readily than old, already-hardened stems, so much of the climbing habit you end up with comes from what the plant produces after training starts, not from bending what was already there.
How tight should the ties be around the stem?
Ties should be snug enough that the stem cannot slide up and down the pole, but loose enough that a finger slides underneath without resistance.
This matters because a tie that constricts the stem cuts off the vascular tissue carrying water and nutrients past that point, which starves everything above the tie even while the roots below remain perfectly healthy.
Because the stem keeps thickening as the plant grows, a tie that was correctly loose when applied can become tight within a few weeks without anything else changing, which is why checking tie tension regularly matters more than getting it exactly right on day one.
Does training a Monstera to climb actually make the leaves split more?
Yes, indirectly. Leaf fenestration, the splits and holes Monsteras are grown for, is linked to the plant’s maturity and light exposure more than to climbing itself, but climbing is usually what gets the plant into the conditions that trigger mature growth.
A plant that is climbing is typically also reaching toward brighter light and producing larger leaves as it goes, and both of those factors are what push the plant from its small, solid-leafed juvenile form into its larger, deeply fenestrated mature form.
A plant left to sprawl along the ground in the same light conditions tends to stay juvenile for considerably longer, simply because nothing is prompting the change.
How often should I mist the pole once my Monstera has attached to it?
Established aerial roots need slightly less frequent misting than a newly installed pole, since a root that has already gripped and thickened against the surface holds onto moisture for longer than bare moss does.
As a starting point, misting two to three times a week keeps most poles adequately damp in an average UK home, increasing to daily in centrally heated rooms during winter when the air is driest.
Touch the moss below the surface rather than going by a fixed schedule; if it still feels damp an inch down, wait another day or two before misting again.
Key Takeaways
- A moss pole, coir pole, stake, or trellis all work by giving aerial roots or ties something to grip; none is objectively better, only better suited to a given plant’s size and stage.
- Aerial roots need consistent moisture, not just an occasional spray, to trigger the attachment response, which is the single most common reason training appears to fail.
- Check tie tension weekly. The stem thickens as it grows, and a tie that was loose enough when applied can become constricting within a few weeks.
- Watch the base of the pole and the lowest ties for signs of trapped moisture. Stem rot at the base is the risk most guides never mention, and it spreads fast once it starts.
- A shrivelled, dry stem needs more moisture. A soft, dark, smelly stem needs less moisture and prompt pruning. Telling the two apart correctly matters more than reacting quickly.
- New growth ignoring a trellis is more often a light problem than a training problem; check light levels before assuming the method has failed.
- Prune at a node, not mid-stem, so the plant’s growth signals redirect to a live bud rather than leaving a dead stub.
- Cuttings removed while training the plant can be propagated rather than discarded, provided each piece includes at least one node.
Final Thoughts
Training a Monstera to climb is less about any single technique and more about consistency at the point where the plant actually makes contact with its support.
Almost every problem covered in this guide, roots that will not attach, ties that quietly girdle a stem, rot that sets in unnoticed at the base of a pole, traces back to that same narrow zone getting either too little moisture or too much, for too long, without anyone checking.
Get that one detail right, checked regularly rather than set up once and forgotten, and the rest of the process genuinely does look after itself: the plant will find its own way up, the way it has been doing in rainforest canopies for millions of years, if you simply give it something to hold onto and keep that contact point in good condition.
| What’s Next If your Monstera already has a pole but does not seem to be gripping it, the fastest useful check is the one described earlier in this guide: push a finger into the moss an inch or two below the surface. If it is dry, that is very likely the whole problem, and a more consistent misting routine over the next month is the place to start before trying anything more drastic. |
Hi, I'm Matt,
An amateur gardener with a houseplant habit that got slightly out of hand.
I started Bean Growing to share what I've learned from a few years of trial, error, and the occasional dead plant.
I grow a mix of houseplants and outdoor shrubs in the UK but try to expand my knowledge to the US. I try to write about what actually works