
Learn how to propagate Cissus Discolor effortlessly using water, soil, or layering, perfect for beginner gardeners seeking lush, healthy vines!
Why Propagate Cissus Discolor?
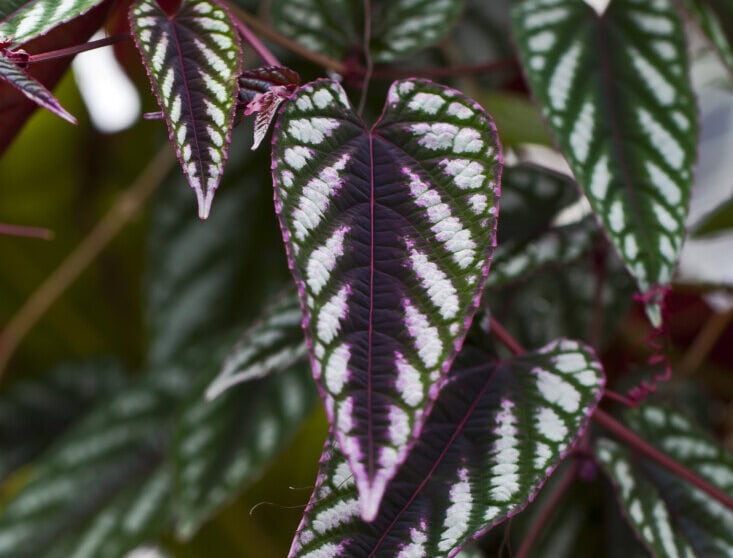
Cissus discolor, also known as the rex begonia vine, is prized for its dramatic foliage and trailing habit. Propagating your own cuttings allows you to multiply this eye-catching beauty without spending extra on new plants.
Stem Cuttings: Propagating in Water
Discover the simple method of propagating Cissus Discolor in water using stem cuttings, perfect for beginners to enjoy fast, visible roots!
Choose the Right Cutting
- Select a healthy vine segment with 2–4 leaves and at least one visible node (“joint”).
- Cut just below the node using clean scissors or pruners to ensure a healthy start.
Prep for Water Propagation
- Strip lower leaves to expose the node.
- Place the cutting in a jar with filtered or room-temperature water, ensuring the node is submerged.
- Position in bright, indirect sunlight to simulate tropical understory light.
Maintain & Monitor
- Change water every 3–7 days to avoid stagnation and rot.
- Expect roots within 2–6 weeks, and once they’re ~2 inches long, the cutting is ready for soil.
Troubleshooting Tips
- If rot sets in, trim off blackened areas and refresh both water and jar.
- Leaves yellowing? Likely due to low light or nutrient deficiency; move jar slightly closer to light.
Propagating Cissus Discolor in Soil: Step-by-Step Guide
Learn how to propagate Cissus Discolor in soil with this easy, step-by-step guide. Perfect for beginners who want a hands-free rooting process with lasting results!
Soil propagation is a great method if you want your cuttings to skip the water stage and go straight into growing. It’s also less shocking for the plant once it takes root, as it stays in the same medium from the start.
Preparing the Right Soil Mix
To ensure success, use a well-draining, airy soil mix that supports root development while preventing rot. Try this easy DIY blend:
| Component | Ratio | Purpose |
| Potting soil | 2 parts | Nutrient base |
| Perlite or pumice | 1 part | Drainage and airflow |
| Coconut coir or peat | 1 part | Moisture retention, light texture |
Avoid compacted or clay-heavy soil, it holds too much water and invites fungal issues.
Taking and Preparing the Cutting
- Use clean, sterilized scissors to cut a 4–6-inch stem with at least one node and a couple of healthy leaves.
- Remove the lower leaves, leaving the top two intact.
- Optionally, dip the cut end into rooting hormone powder to speed up rooting and reduce disease risk.
Planting the Cutting
- Make a small hole in the pre-moistened soil using a stick or pencil.
- Insert the cutting so that at least one node is buried beneath the soil line.
- Firm the soil gently around the stem to hold it upright.
- Mist the top lightly to settle the soil.
Creating the Right Conditions for Rooting
- Humidity is key. Place a clear plastic bag or dome over the pot to create a mini greenhouse.
- Keep the plant in bright, indirect light, not direct sun.
- Water sparingly, just enough to keep the soil lightly moist but never soggy.
Roots typically form in 3 to 5 weeks. Gently tug after a few weeks to check resistance, a sign roots are forming.
Extra Tips for Success
- Use a heat mat to encourage faster root development in cooler climates.
- Avoid overwatering, this is the #1 reason soil cuttings fail.
Layering Technique for Cissus Discolor Propagation
Explore the layering method to propagate Cissus Discolor right from the mother plant. It’s a no-stress, high-success technique ideal for beginner gardeners!
Layering is a propagation method where you root part of the plant while it’s still attached to the mother vine. It’s ideal for trailing plants like Cissus discolor and nearly foolproof.
What Is Layering and Why Use It?
Layering mimics how plants propagate in the wild. A healthy vine touches soil, roots at a node, and a new plant forms, simple as that.
This method eliminates transplant shock since the plant continues to receive nutrients from the parent while forming roots.
Step-by-Step Guide to Layering
Step 1: Select a Low, Healthy Vine
Choose a healthy trailing vine near the soil surface. Ideally, pick a stem with at least one visible node and a few healthy leaves.
Step 2: Prep the Soil
Use a small pot filled with a well-draining mix (similar to the one in the soil propagation section), or simply place fresh soil on the surface of the existing pot if there’s space.
Step 3: Pin the Node to the Soil
- Gently bend the vine so a node rests on the soil surface.
- Use a bobby pin, floral wire, or a small stone to hold it down.
- Ensure that the node has good contact with the soil.
Step 4: Mist and Wait
Mist the node regularly to keep it slightly moist. Within 2–4 weeks, roots should begin to grow from the buried node.
Separating the New Plant
Once roots are visible or the new section resists gentle tugging, you can snip the stem away from the mother plant, pot it up, and treat it like a young Cissus discolor!
Bonus Tip: Air Layering for Advanced Gardeners
If you want to get fancy, try air layering:
- Wrap damp sphagnum moss around a node on a vine.
- Enclose it in plastic wrap and secure it.
- Once roots grow inside the moss (~3–6 weeks), cut below and pot it up!
Layering is perfect for gardeners who don’t want to worry about humidity domes or water jars. It’s slow and steady, but the success rate is high.
When Is the Best Time to Propagate Cissus Discolor?
Find out the best time to propagate Cissus Discolor so your cuttings root quickly and thrive. Timing is key to successful propagation for beginner gardeners!
While you can technically propagate Cissus discolor year-round indoors, some seasons are far more favorable for encouraging root growth and overall success.
Ideal Season: Spring and Early Summer
The best time to propagate Cissus discolor is during spring to early summer, when the plant enters its active growing phase. During these months:
- Longer daylight hours stimulate stronger root growth.
- Warmer temperatures (70–85°F) encourage faster cell development.
- The plant is already producing new leaves and stems, making it more responsive to cutting and propagation.
Avoid Propagating in Fall or Winter
During colder months:
- Growth slows dramatically or halts.
- Rooting may take twice as long or fail altogether.
- The plant is focusing energy on survival, not expansion.
If you must propagate in winter (e.g., due to breakage), use a heat mat and grow light to simulate spring conditions, and expect slower results.
Time of Day Matters Too
Propagate in the morning, when the plant is fully hydrated from overnight rest and the temperature is still mild. This minimizes transplant shock and keeps moisture loss to a minimum during the cut.
Visual Tip: Timing Cheat Sheet
| Season | Propagation Success Rate | Notes |
| Spring | ⭐⭐⭐⭐⭐ | Best time; fast root development |
| Early Summer | ⭐⭐⭐⭐ | Still ideal with warmth and light |
| Late Summer | ⭐⭐⭐ | Possible but risk of heat stress |
| Fall | ⭐⭐ | Slower growth; less reliable |
| Winter | ⭐ | Difficult without supplemental tools |
Tools & Supplies Needed to Propagate Cissus Discolor
Gather the right tools to propagate Cissus Discolor successfully. From pruning shears to soil mix, having these supplies on hand makes the process easy and effective!
Before you make your first cut, having the right tools and supplies can make all the difference. Preparedness helps prevent disease, ensures clean cuts, and improves rooting success rates.
Essential Propagation Tools
| Tool | Purpose |
| Sharp, sterile scissors or pruning shears | Make clean, precise cuts at the node |
| Rubbing alcohol or hydrogen peroxide | Sterilizes cutting tools to prevent infection |
| Rooting hormone (optional) | Boosts root development and reduces fungal risk |
| Clear glass jar or water container | For water propagation; helps monitor root growth |
| Small nursery pots (3–4″) | For soil or transplanting rooted cuttings |
| Plastic bag or humidity dome | Creates a greenhouse effect for cuttings |
| Spray bottle | Mists soil or cuttings to maintain humidity |
| Labels and markers | Keep track of propagation dates or plant IDs |
Recommended Soil and Potting Materials
For soil-based propagation or transplanting, these materials help create the ideal environment for new roots:
- Light, well-draining potting mix (see earlier recipe)
- Perlite or pumice for added drainage
- Coconut coir or peat moss for moisture control
- Grow light (optional in low-light homes)
Optional but Helpful Extras
- Heat mat: Keeps soil at ideal rooting temperature (70–75°F)
- Clear plastic cups: Great for watching soil-based root growth
- Sphagnum moss: Can be used in air layering or as a gentle rooting medium
Pro Tip: Keep a Propagation Station Ready
Having a dedicated space or small bin with your propagation tools organized makes it easier to jump into action when you spot the perfect cutting opportunity.
Troubleshooting Cissus Discolor Cuttings: Root Rot & Legginess
Learn how to fix common problems like root rot and legginess when propagating Cissus Discolor. These expert tips help beginners rescue cuttings and boost success.
Even when you follow every step correctly, issues like root rot or weak, leggy stems can still crop up. Don’t worry, these are common, and with a few adjustments, you can often save your cutting and still grow a healthy plant.
Recognizing and Treating Root Rot
Root rot usually occurs in water propagation or overly moist soil. You’ll notice:
- Black, mushy roots
- Foul odor from the water or soil
- Wilting or yellowing leaves despite moisture
How to Fix It:
- Remove the cutting immediately from water or soil.
- Trim away all black or mushy root sections with sterile scissors.
- Let the cutting dry for a few hours before re-rooting in fresh water or dry soil.
- Add a drop of hydrogen peroxide to the water to prevent bacteria if re-propagating in water.
Pro Tip: Change water every 2–3 days and use a breathable pot for soil to reduce rot risk.
Dealing with Leggy or Weak Growth
Leggy stems happen when your cutting stretches toward the light, usually due to:
- Insufficient light
- Too much nitrogen in soil
- Lack of pruning or pinching
How to Fix It:
- Move your propagation setup to bright, indirect light, a south- or east-facing window is ideal.
- Use a grow light if natural light is weak.
- Once the cutting is rooted and stable, pinch back new growth to encourage branching.
- Avoid feeding with fertilizer until the plant is fully rooted and producing new leaves.
Quick Troubleshooting Table
| Problem | Cause | Solution |
| Root rot | Overwatering, poor drainage | Remove rot, replant in fresh medium |
| Yellow leaves | Water stagnation, poor light | Refresh water, provide indirect sunlight |
| Leggy stems | Not enough light | Use brighter location or supplement with light |
| No roots | Cold temps, dry air | Use heat mat, raise humidity |
Caring for Newly Propagated Cissus Discolor Plants
Learn how to care for newly propagated Cissus Discolor to help your baby vines grow strong and healthy. This guide is perfect for beginners nurturing fresh cuttings!
Once your cutting has rooted, whether in water, soil, or via layering, it’s time to help it transition into a mature, thriving plant. The first few weeks after propagation are crucial for establishing long-term success.
Transplanting Water-Rooted Cuttings
If you rooted your Cissus discolor in water:
- Wait until roots are at least 2–3 inches long and have multiple branches.
- Prepare a small pot (3–4 inches) with your recommended airy potting mix.
- Gently hold the cutting and fill soil around the roots, being careful not to break them.
- Water lightly to settle the soil.
Avoid compacting the soil too much, Cissus discolor prefers aeration!
Light and Placement
Newly propagated plants are more sensitive to their environment. Place your baby vine:
- In bright, indirect light (no direct sun yet)
- Away from cold drafts or heat vents
- Near a humidifier or grouped with other plants to boost humidity
If the leaves start to curl or wilt, increase humidity or slightly reduce light exposure until the plant adjusts.
Watering and Feeding
- Watering: Keep the soil lightly moist but never soggy. Let the top inch dry out before watering again.
- Feeding: Wait 4–6 weeks before applying any fertilizer. When ready, use a diluted balanced liquid fertilizer (e.g., 10-10-10) once a month.
Signs of Success
Look for:
- New leaf growth within 2–3 weeks
- Vivid coloring on leaves (deep green with silver patterns)
- Firm, upright stems
These are all signs your new Cissus discolor plant is happy and establishing well!
Common Mistakes When Propagating Cissus Discolor and How to Avoid Them
Avoid the most common mistakes when propagating Cissus Discolor with these beginner-friendly tips. Learn what not to do to increase your chances of success!
Even though Cissus discolor isn’t the hardest plant to propagate, it’s easy to make avoidable mistakes, especially if you’re new to gardening. Here’s how to sidestep the most common errors.
Mistake #1: Using Dull or Dirty Tools
Cutting with blunt or unclean scissors can:
- Crush plant tissue instead of slicing cleanly
- Transfer bacteria or fungus, leading to rot
Avoid it: Always sterilize your tools with rubbing alcohol or boiling water before and after use.
Mistake #2: Cutting Too Close to the Leaf or Node
A cutting without a clear node (the joint where leaves grow) won’t root, no matter how long you wait.
Avoid it: Make your cut just below a node and ensure at least one node is included in the cutting.
Mistake #3: Overwatering or Keeping Soil Too Wet
This is the #1 reason cuttings fail in soil. Constant moisture leads to root rot before roots even begin to form.
Avoid it: Use a well-draining mix and mist the soil instead of drenching it. Water only when the top feels dry to the touch.
Mistake #4: Propagating in Low Light
Without adequate light, the cutting will:
- Grow leggy
- Struggle to root
- Develop discolored or curled leaves
Avoid it: Place your setup in bright, indirect light, or supplement with a grow light if indoors.
Mistake #5: Checking the Cutting Too Often
It’s tempting to tug on your cutting to see if roots are growing, but this can stress or damage delicate new root hairs.
Avoid it: Be patient. Wait 2–3 weeks before checking and gently feel for resistance rather than pulling.
Quick Mistake-Avoidance Table
| Mistake | Consequence | Fix |
| Dull tools | Plant damage, infection | Sterilize tools before cutting |
| No node in cutting | Won’t root | Always cut below a node |
| Overwatering soil | Rot, mold growth | Use airy mix, water sparingly |
| Insufficient light | Weak or no growth | Provide bright, indirect light |
| Disturbing roots too early | Root failure | Wait until roots are 2″ or more |
Aftercare & Potting Tips for Young Cissus Discolor Shoots
Give your newly propagated Cissus Discolor the best start with proper aftercare and potting tips. Learn how to help young vines thrive in their new homes!
Once your propagation has been successful and roots have formed, it’s time to move your young Cissus discolor into its permanent pot. But what you do next determines how fast (and how beautifully) it will grow.
Choosing the Right Pot
Pick a pot that:
- Is 1–2 inches wider than the root ball
- Has drainage holes to prevent root rot
- Is made of breathable material like terra cotta (great for airflow) or plastic (better moisture retention)
Avoid oversized pots, the extra soil can stay too wet and rot young roots.
Selecting a Good Potting Mix
Cissus discolor likes an airy, moisture-retentive mix that also drains well. Use the same formula recommended for propagation:
| Ingredient | Amount | Purpose |
| Potting mix | 2 parts | Nutrient base |
| Perlite or pumice | 1 part | Drainage and aeration |
| Coconut coir/peat | 1 part | Light structure and water retention |
Add a dash of worm castings or compost for gentle nutrition.
How to Transplant the Rooted Cutting
- Fill the new pot with soil mix about ⅓ full.
- Gently remove the cutting from its propagation container.
- Position the roots into the new pot and fill in with soil.
- Press lightly around the base and water thoroughly to settle the roots.
Pro tip: Water until it drains out the bottom, then wait until the top inch of soil dries out before watering again.
Light, Humidity & Support After Potting
- Place your potted plant in bright, indirect light.
- Keep humidity above 50%, ideally between 60–70%.
- Consider using a moss pole or trellis if you want your Cissus discolor to climb instead of trail.
Fertilizing Young Plants
Wait about 4–6 weeks before you start feeding. Then:
- Use a diluted, balanced liquid fertilizer (e.g., 10-10-10 or 20-20-20) once a month.
- Avoid overfeeding, too much fertilizer can burn the roots.
Final Thoughts on How to Propagate Cissus Discolor
Master how to propagate Cissus Discolor with confidence! This guide wraps up key tips to ensure beginner gardeners create vibrant, healthy vines every time.
You’ve now explored three reliable propagation methods, water rooting, soil cuttings, and layering, each with its own benefits depending on your style, environment, and patience. Based on insights from top guides, here’s a quick recap:
- Water propagation is clean and visually satisfying, though roots may be more delicate.
- Soil propagation encourages sturdier absorption, especially when you use an airy, well-draining mix and optional rooting hormone.
- Layering is virtually foolproof, roots develop while still tethered to the mother plant, minimizing shock.
Boxed Summary for Friendliness & Expertise
| Method | Best For | Tip for Success |
| Water Cuttings | Beginners, visual learners | Use filtered water; change every few days |
| Soil Cuttings | Stronger roots | Opt for airy, well-draining mix, mist soil |
| Layering | Stress-free success | Secure a node against soil and wait 2–4 weeks |
Key Pro Tips
- Always propagate during spring to early summer, this maximizes growth potential.
- Optimize cutting health: use sharp, sterile tools, and cut just below a node.
- Safeguard against rot and legginess: maintain humidity, adequate light, and well-drained media at all stages.
By blending these curated techniques and expert insights, your propagation journey can be both rewarding and reliable. Whether you’re sharing cuttings with a friend or adding trailing beauty to your home, mastering how to propagate Cissus Discolor opens a world of lush possibilities.