
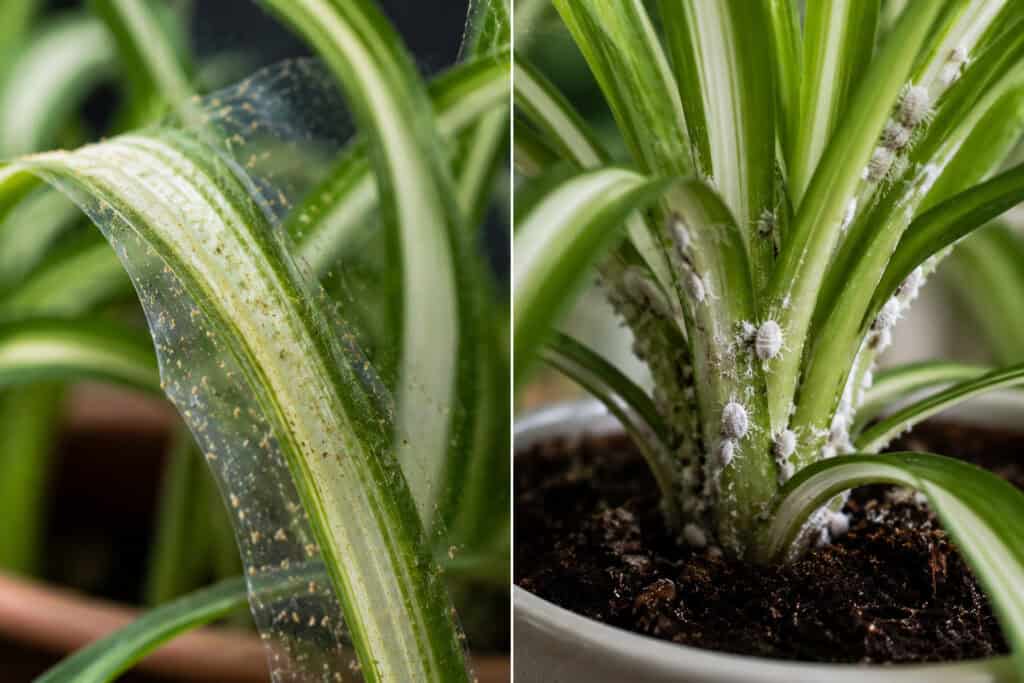
How to tell them apart, treat both correctly, and stop the infestation coming back
Spider plants (Chlorophytum comosum) are usually easy houseplants, but they are not immune to the two pests that trouble almost every indoor plant collection: spider mites and mealybugs.
Both feed by piercing plant cells and draining fluid, and both can quietly build large populations before you notice anything wrong.
If your spider plant’s leaves look dull, stippled, or slightly gritty, or you have spotted a white cottony fluff at a leaf joint, this guide will help you identify which pest you are dealing with and treat it correctly the first time.
Most online advice stops at “spray neem oil and you’re done,” which is why so many people end up re-treating the same plant three or four times and wondering why the pests keep returning.
The real answer, in almost every case, comes down to two things: eggs that survive contact treatments, and hiding places that get missed. This guide covers both.
| Why Trust This Guide This guide draws on horticultural pest-control guidance from the Royal Horticultural Society and the University of Minnesota Extension, combined with practical treatment schedules tested against the egg-hatch cycles of both pests. Every product recommendation and timing interval below reflects how these pests actually reproduce indoors, not just what kills visible adults. |
Quick Answer: Spider Mites or Mealybugs?
Use this table to identify the pest in under a minute, then jump to the matching treatment section.
| Sign | Spider Mites | Mealybugs | Do This First |
| Fine webbing | Yes, thin threads under leaves | Rarely | Isolate the plant immediately |
| White cottony masses | No | Yes, at leaf joints and stem bases | Dab with 70% isopropyl alcohol |
| Pale stippling on upper leaves | Yes | Rare | Check leaf undersides with a hand lens |
| Sticky residue (honeydew) | Uncommon | Yes, leaves and pot rim feel tacky | Wipe down leaves and pot exterior |
| Yellowing or bronzing | Yes, starts at leaf tips | Yes, more generalised | Check for a root infestation too |
Not sure the problem is pests at all? Spider plant leaves also discolour from watering issues and light stress.
If you are not seeing webbing, stippling, or cottony clusters, check our guides to spider plant leaves turning yellow and spider plant brown tips to rule out a non-pest cause before you treat.
Identifying Spider Mites and Mealybugs on Spider Plants
Getting the identification right matters more than it sounds. The treatments that work well against spider mites are not especially effective against mealybugs, and treating for the wrong pest wastes time and stresses the plant unnecessarily.
What Spider Mites Look Like
Spider mites (most commonly Tetranychus urticae, the two-spotted spider mite) are arachnids, not insects.
They are tiny, less than 1/20 of an inch long, and nearly impossible to see with the naked eye. What you will notice first is the damage they leave behind.
Look for these signs:
- Fine, thin webbing stretched between leaves or across leaf undersides. It looks more like cobweb filament than a spider’s web, often with a dusty appearance from mite waste
- Pale grey or yellowish stippling on the upper leaf surface, where each tiny dot marks a cell the mite has pierced and drained
- A dry, gritty texture when you run a finger along the leaf, caused by shed mite skins and frass
- Leaves that look underwatered even when the soil is adequately moist, since spider mites disrupt the plant’s water regulation before yellowing appears
To confirm, hold a white sheet of paper beneath an affected leaf and tap it sharply. If tiny specks fall and move, you have mites.
A 10x hand lens or a smartphone macro camera will show the oval body and two dark spots that give the two-spotted spider mite its name.
What Mealybugs Look Like
Mealybugs are easier to spot once you know what to look for. Adult females are oval, around 3 to 4mm long, and covered in a waxy white coating that gives a powdery, cottony appearance.
They gather in the most protected spots on the plant.
- White cottony masses at leaf axils and along the undersides of leaves near the midrib
- A sticky, glossy honeydew residue on leaves, the pot rim, or the saucer
- Sooty black mould developing on honeydew-coated surfaces, a sign the infestation has been active for some time
- Yellowing, listless leaves that do not respond to normal watering or feeding adjustments
| Overlooked Detail Mealybug larvae are a fraction of the size of adults, sometimes under 1mm, and are nearly invisible against leaf tissue. If you only treat visible adults, expect a re-infestation within two to three weeks as those larvae mature. Mealybugs also frequently nest on the outside of the pot, under the drainage lip, and in the saucer, so check there too, not just the plant itself. |
Why Spider Plants Are Vulnerable
Spider plants are generally resilient, but their arching leaves and dense basal rosettes create sheltered, low-airflow pockets, exactly the microclimate both pests prefer.
Warm, dry indoor air (typical during winter heating season) pushes humidity below 40%, which accelerates spider mite reproduction significantly.
Mealybugs, meanwhile, are drawn to soft, nitrogen-rich tissue, so an overfertilised or freshly repotted plant is more attractive to them.
For general watering and feeding guidance that keeps plant tissue appropriately firm rather than soft and vulnerable, see our spider plant care guide and our guide to fertilising a spider plant.
Newly purchased spider plants and their offshoots (the plantlets on runners) are common entry points for both pests.
If you are propagating from an existing plant, see our guide on how to propagate a spider plant for the inspection steps to take before potting up a new plantlet.
How to Treat Spider Mites on Spider Plants
Step 1: Isolate the Plant Immediately
Move the affected plant away from all other houseplants the moment you identify the infestation.
Spider mites spread via air movement and direct contact between touching leaves, so isolation should happen before any treatment begins.
Step 2: Remove Webbing and Surface Mites
Before spraying, physically remove as much of the existing population and webbing as possible.
Webbing repels spray and protects eggs underneath it, so this step dramatically improves the effectiveness of everything that follows.
Shower the plant in a sink or bathtub with a gentle but steady stream of water, directing it at the leaf undersides, and let it drain fully before treating.
Alternatively, wipe every leaf surface with a damp cloth, working from base to tip on both sides.
Step 3: Apply a Contact Treatment
Insecticidal soap is the most reliable first-line treatment. It kills mites on contact by disrupting their protective membrane and breaks down quickly with minimal risk to the plant.
Mix around 1 teaspoon of pure liquid castile soap per quart of water, or use a ready-made insecticidal soap labelled for mites.
Apply to every leaf surface, top and bottom, and into every leaf axil. Missing the undersides, where mites feed, lay eggs, and shelter, is the single most common reason treatments fail.
Neem oil is a useful alternative for heavier infestations because it disrupts the mite life cycle rather than just killing adults on contact.
Dilute around 2 teaspoons per quart of water with a few drops of liquid soap as an emulsifier, and apply at dusk to avoid leaf burn.
Step 4: Repeat on a Strict Schedule
This is where most treatments fail. Eggs are unaffected by contact treatments and hatch within 3 to 7 days, restarting the cycle. For insecticidal soap, treat every 5 to 7 days for a minimum of 3 weeks.
For neem oil, treat every 7 days for 3 to 4 weeks. Do not skip treatments or extend the gap, or egg hatching will outpace your control efforts.
| The 3-Treatment Rule Three separate treatments at regular intervals is the functional minimum for breaking the spider mite life cycle. Treating once and waiting to see if they come back is one of the most common mistakes, since by the time they reappear visibly, the population has already recovered. Commit to the full schedule before reassessing. |
Does Raising Humidity Help?
Raising indoor humidity discourages spider mite reproduction and is a genuinely useful supporting measure, but it is not a treatment on its own.
A humidifier slows the population between treatments but will not eliminate an active infestation, so use it alongside a contact treatment rather than as a replacement.
The commonly repeated advice to “mist daily to prevent mites” overstates the effect: brief misting does not sustain elevated humidity for long, and frequent wetting of the foliage can invite fungal issues instead.
For more detail on getting humidity right for spider plants without overwatering, see our guide to watering a spider plant.
How to Treat Mealybugs on Spider Plants
Mealybugs move more slowly than spider mites but are harder to fully eliminate.
Their waxy coating repels many spray treatments, and their habit of hiding in crevices and on pot exteriors means partial treatments almost always lead to re-infestation.
Step 1: Isolate and Inspect Thoroughly
Isolate immediately, then inspect thoroughly before treating. Check the leaves and stems, the base of the plant near the soil line, the outside of the pot including beneath any rim, and the saucer.
Mealybugs nesting in these overlooked spots are the most common reason infestations persist after treatment.
Step 2: Manual Removal
Manual removal is the most effective first step and should not be skipped in favour of spraying alone.
Dip a cotton swab in 70% isopropyl alcohol and press it directly onto each visible cluster; the alcohol dissolves the waxy coating and kills the insect on contact.
Masking tape is more effective than alcohol swabs for removing larvae, since the tape lifts both adults and the tiny larvae surrounding them that are too small to remove with a swab.
Press lightly onto infested areas and peel away slowly, using a fresh strip for each section of the plant. Remove and discard any heavily infested leaves entirely before spraying.
Step 3: Apply Insecticidal Soap or Neem Oil
After manual removal, apply insecticidal soap or neem oil as a follow-up spray.
For mealybugs, neem oil has a meaningful advantage because it contains azadirachtin, which disrupts the reproductive cycle in addition to killing on contact.
Insecticidal soap is effective but needs even more thorough coverage, since the soap must physically contact each insect.
Apply to the entire plant, including stem bases, the soil surface near the stem, and the exterior surfaces of the pot.
Do not apply neem oil in bright direct light or when temperatures exceed 85°F, as either condition increases the risk of leaf burn.
Step 4: Check and Treat the Roots
Root mealybugs are a real and frequently missed complication.
If your spider plant continues to decline despite thorough above-ground treatment, unpot it and inspect the roots, where root mealybugs appear as white waxy clusters at the root-stem junction.
If you find them, rinse the root ball thoroughly under running water, then repot into fresh sterile potting mix and water in with a diluted insecticidal soap drench.
This is the only reliable approach; no spray treatment penetrates deep enough into the root zone to address an established root infestation without repotting.
Step 5: Treat the Pot and Surrounding Area
Wipe down the entire pot exterior with soapy water, including under the rim and around drainage holes, then clean or replace the saucer.
Any surface that has touched an infested plant should be treated, because mealybugs can survive off the plant briefly and will migrate back given the chance.
Treatment Methods at a Glance
| Treatment | Best For | How to Apply | Key Limitation |
| Insecticidal soap spray | Active spider mite infestations | Spray upper and lower leaf surfaces; repeat every 5–7 days for 3 weeks | Must contact mites directly; dries ineffective |
| Neem oil (diluted) | Both pests; mild to moderate infestations | Apply at dusk; avoid soil contact; repeat weekly for 3–4 weeks | Can cause leaf burn above 85°F or on stressed plants |
| 70% isopropyl alcohol swab | Mealybugs on visible clusters | Dab directly onto each bug; reapply weekly | Ineffective against hidden larvae and root mealybugs |
| Masking tape (physical removal) | Early mealybug infestations; mite egg removal | Press lightly onto affected areas; discard tape immediately | Not suitable for soft or textured leaves |
| Forceful water shower | Spider mites on sturdy plants | Shower undersides of all leaves; repeat every 3 days | Does not kill eggs; must follow with a contact treatment |
| Horticultural oil | Both pests; moderate to heavy infestations | Full coverage spray at dusk; avoid temperatures above 85°F | Suffocates roots if it reaches soil; test leaf tolerance first |
| Warning: Avoid Broad-Spectrum Insecticides for Spider Mites Products containing pyrethroids or organophosphates are not only ineffective against spider mites, they actively make infestations worse. These insecticides kill the mites’ natural predators while stimulating mite reproduction, and can trigger population spikes within days. This effect is documented by University of Minnesota Extension and mirrored in UK guidance from the RHS. Stick to insecticidal soap, horticultural oil, or neem oil for spider mites specifically. |
Preventing Re-Infestation
Treating an active infestation is only half the work. The conditions that allowed the first outbreak are usually still present unless something changes.
Environmental Adjustments That Actually Help
For spider mites, the single most effective change is raising indoor humidity during the heating season, since mites reproduce dramatically faster in dry air below 40% relative humidity.
A small humidifier near your plant collection in winter is one of the most practical preventive investments you can make.
For mealybugs, avoid overfertilising: excess nitrogen produces the soft, rapidly growing tissue mealybugs prefer, so if you are feeding more than once a month during the growing season, scaling back can reduce vulnerability.
Our guide to spider plant light requirements also covers how brighter, more consistent light keeps growth sturdy rather than soft and pest-prone.
Quarantine New Plants
Every new plant should be quarantined for at least two to three weeks before it goes near your existing collection.
Two weeks is enough time for most egg stages to hatch and become visible.
Keep new arrivals in a separate room, inspect them twice a week, and treat prophylactically with insecticidal soap before introducing them to your other plants.
This single habit prevents the vast majority of pest introductions.
Regular Inspection Routine
A quick inspection once every 7 to 10 days catches most infestations before they become serious. Focus on the undersides of leaves, leaf axils, and the area around the soil line.
Wipe leaves with a slightly damp cloth every 2 to 3 weeks to remove dust that can harbour mite eggs and to disrupt any early-stage populations before they establish.
| UK Reader Note: Glasshouse Red Spider Mite In the UK, the most common spider mite species on houseplants is the glasshouse red spider mite (Tetranychus urticae), recognised by the RHS as a key houseplant and greenhouse pest. The RHS recommends starting with cultural and biological controls before pesticides, including the predatory mite Phytoseiulus persimilis, which can be ordered for release indoors to hunt and consume spider mites. The RHS does not recommend routine pesticide use for indoor plants, though natural pyrethrum-based products are available for severe infestations. |
Common Mistakes That Keep Pests Coming Back
Most repeat infestations are not bad luck. They have a specific, fixable cause.
Treating Only Once
A single spray application creates the illusion of progress. Visible adults and nymphs die, the plant looks better, and the treatment is declared a success.
Then, 10 to 14 days later, the eggs hatch and the population recovers.
The only way to break this cycle is to treat repeatedly on a schedule that accounts for egg development time, typically 5 to 7 day intervals for 3 full weeks minimum.
Missing the Pot Exterior for Mealybugs
This is probably the single most underreported cause of recurring mealybug problems.
Adult mealybugs crawl off the plant and establish nesting colonies on the pot exterior, under drainage lips, and in saucers.
If you treat only the plant, those colonies migrate back within days, so every treatment cycle should include the pot, the drainage area, and the surface the pot sits on.
Skipping the Root Inspection
A spider plant that stays unhealthy despite thorough above-ground treatment almost always has a root-level problem, either root mealybugs or roots damaged by prolonged mite feeding.
Unpotting and inspecting the roots adds ten minutes to your treatment routine but can save a plant that would otherwise continue to decline.
If the leaves are drooping alongside pest activity, our guide to spider plant leaves drooping can help you separate pest-related stress from a watering problem.
Using Neem Oil in Bright Sun or Heat
Neem oil applied in direct sunlight or above 85°F frequently causes leaf burn, particularly on narrow leaf tips.
The burn appears as brown, papery patches within 24 to 48 hours of treatment. Apply neem oil in the evening and move treated plants out of direct light until the next morning.
Troubleshooting: When Treatment Is Not Working
| Problem | Likely Cause | Solution |
| Pests return within 2 weeks | Eggs survived; schedule too infrequent | Treat every 5–7 days for 3 full weeks without skipping |
| Leaves yellow after treatment | Neem oil or soap applied in bright sun or on a stressed plant | Move out of direct sun; wait 1 week, then resume treatment |
| Cottony clusters on pot exterior | Mealybugs nesting outside the plant | Wipe all exterior surfaces with soapy water; clean the saucer |
| Webbing keeps reappearing | Low indoor humidity sustaining the population | Run a humidifier; treat simultaneously with insecticidal soap |
| Plant declines despite visible treatment | Root mealybugs below the soil line | Unpot, rinse roots, repot in fresh sterile mix, drench with soap |
Why Pests Keep Coming Back: The Egg Cycle
This is the part most treatment guides either skip or mention too briefly to be useful.
Both spider mites and mealybugs lay eggs that are completely unaffected by every contact treatment available for home use. Insecticidal soap, neem oil, horticultural oil, and alcohol do not kill eggs.
Spider mite eggs hatch in 3 to 7 days depending on temperature and humidity, while mealybug eggs hatch in 7 to 14 days.
That means if you treat on day 1 and check again on day 7, you are often looking at a freshly hatched new generation, not a failed treatment.
Treating every 5 to 7 days for three weeks is not excessive; it is the minimum needed to catch each new hatch cycle before those individuals mature and lay more eggs.
There is also a temperature effect worth knowing. At indoor temperatures around 75 to 80°F, spider mites can complete a full generation, egg to egg-laying adult, in as little as 5 days.
During a warm summer in a well-heated home, the reproductive rate can outpace a weekly treatment schedule if coverage is incomplete.
If your home runs warm, treat every 4 to 5 days rather than every 7.
How Spider Plant Care Conditions Affect Pest Vulnerability
Pest pressure does not exist in isolation from the rest of how the plant is cared for.
Low light produces softer, slower-growing tissue with less capacity to replace pest damage, so a plant in bright indirect light recovers from a treated infestation noticeably faster than one in a dark corner.
Dry indoor air, as covered above, is the primary driver of spider mite outbreaks, and homes with forced-air winter heating often drop below 30% relative humidity.
Overwatering does not cause mites directly, since they live on the plant rather than in the soil, but the resulting stress weakens the plant’s defences generally.
For a full breakdown of watering frequency that avoids this, see spider plant overwatering signs.
Overcrowding is the last factor worth addressing: plants packed closely together create direct contact pathways for mite movement and reduce the airflow that keeps mealybug conditions in check.
Spacing plants so leaves do not touch is simple but effective.
Frequently Asked Questions
How do I know if my spider plant has spider mites or mealybugs?
Spider mites produce fine, thread-like webbing on leaf undersides and pale stippling on the upper surface, often with a dusty, washed-out look overall.
Mealybugs leave white cottony clusters at leaf joints, and the leaves or pot surface may feel sticky from honeydew.
Confirm by tapping a leaf over white paper: moving specks indicate spider mites, while visible white oval insects indicate mealybugs.
Can spider mites kill a spider plant?
Yes, but it typically takes a prolonged, untreated infestation.
As the population grows, cumulative cell damage depletes the plant’s ability to photosynthesise, causing leaves to yellow, brown, and eventually drop.
Spider plants are reasonably resilient, and catching an infestation within the first two to three weeks gives the plant a strong chance of full recovery.
Why do mealybugs keep coming back after treatment?
Recurring infestations almost always trace to one of three causes: eggs that survived treatment and hatched, colonies on the pot exterior or saucer that were never treated, or root mealybugs below the soil line that no surface spray can reach.
Treat the plant and the pot exterior together weekly for three to four weeks, and inspect the pot base and saucer at every session.
Is neem oil safe to use on spider plants?
Neem oil is generally safe when diluted correctly (around 2 teaspoons per quart of water with a little liquid soap as an emulsifier) and applied at dusk or in shade rather than direct sunlight or heat above 85°F.
The main risks are leaf burn from bright light or heat, and root damage if oil contacts the soil directly, so direct the spray at foliage rather than the soil surface.
Should I throw away a heavily infested spider plant?
Discarding is rarely necessary unless root damage is severe or root mealybugs have largely destroyed the root system.
Most infestations, even heavy ones, respond to consistent treatment over three to four weeks. If new leaves are still emerging, even slowly, the plant has enough active tissue to recover.
If you are unsure, isolate it and treat it as recoverable for two full weeks before deciding.
For general recovery signs once pests are under control, see our guide on why a spider plant is not growing.
Do spider plants attract spider mites more than other houseplants?
Spider plants are not among the highest-risk houseplants; palms, alocasias, crotons, and fiddle-leaf figs are typically more vulnerable.
However, spider plants grown in warm, dry conditions, particularly during winter heating season, are still susceptible, and plants stressed from insufficient light or irregular watering are more vulnerable than thriving specimens.
Can I use dish soap instead of insecticidal soap?
Pure liquid castile soap diluted heavily in water can work as a contact treatment in a pinch, but it is not equivalent to a formulated insecticidal soap and carries a higher risk of leaf damage.
Commercial dish soaps often contain degreasers and fragrances that can harm plant tissue.
If used temporarily, add no more than a few drops per quart of water and rinse the plant thoroughly after 30 minutes.
How long does it take to fully eliminate spider mites or mealybugs?
With consistent treatment, most spider mite infestations come under control in three to four weeks.
Mealybug elimination typically takes four to six weeks, longer if root mealybugs are involved, assuming treatment every 5 to 7 days without gaps.
After visible pests are gone, keep inspecting every 7 to 10 days for at least another month to catch any survivors.
Key Takeaways
- Identify the pest correctly before treating. Spider mites leave webbing and stippling; mealybugs leave white cottony clusters and sticky honeydew, and the treatments differ.
- Isolate any infested plant immediately, before treatment begins, to prevent spread to nearby plants.
- Contact treatments do not kill eggs. Treat every 5 to 7 days for a minimum of three weeks to catch each new hatch cycle.
- For mealybugs, inspect and treat the pot exterior, drainage lip, and saucer at every session, since these overlooked spots are the most common cause of recurrence.
- If mealybugs persist despite thorough surface treatment, unpot the plant and check for root mealybugs, which require repotting into fresh sterile mix.
- Never use pyrethroid or organophosphate insecticides for spider mites; they kill mite predators and stimulate reproduction, making infestations worse.
- Raise indoor humidity during heating season. Below 40% humidity, mites can complete a generation in as little as 5 days.
- Quarantine all new plants for two to three weeks before introducing them to your existing collection.
Final Thoughts
There is a particular kind of frustration in treating a plant pest twice, declaring success, and finding the same problem three weeks later.
Spider mites and mealybugs are persistent precisely because their eggs survive contact sprays and because they hide in the spots most people do not think to check.
Once you understand the egg cycle and the overlooked hiding places (leaf undersides, pot exteriors, drainage areas, and root zones) the treatment process becomes far more predictable.
Most infestations resolve within a month of consistent, properly timed treatment, and spider plants recover well from even moderate damage once the pressure is removed.
For the fuller picture of the conditions that keep a spider plant naturally more pest-resistant, see our complete spider plant care guide.
| What’s Next Set up a simple weekly inspection routine. Pick a consistent day each week, check the undersides of your spider plant’s leaves, the leaf axils, and the base of the pot for the first signs of either pest. Catching an infestation early, five to ten adults rather than hundreds, means treatment takes days rather than weeks. If you would like to expand your collection once this plant is healthy again, our guide to propagating a spider plant in water covers how to do it safely without reintroducing pests. |
Mariel is a plant enthusiast and writer based in the UK with a passion for houseplants and indoor growing.
She has spent the last few years building an ever-growing collection of indoor plants and learning the hard way which ones will survive her busy schedule.
At Bean Growing she writes about houseplant care, common plant problems, and outdoor gardening.