
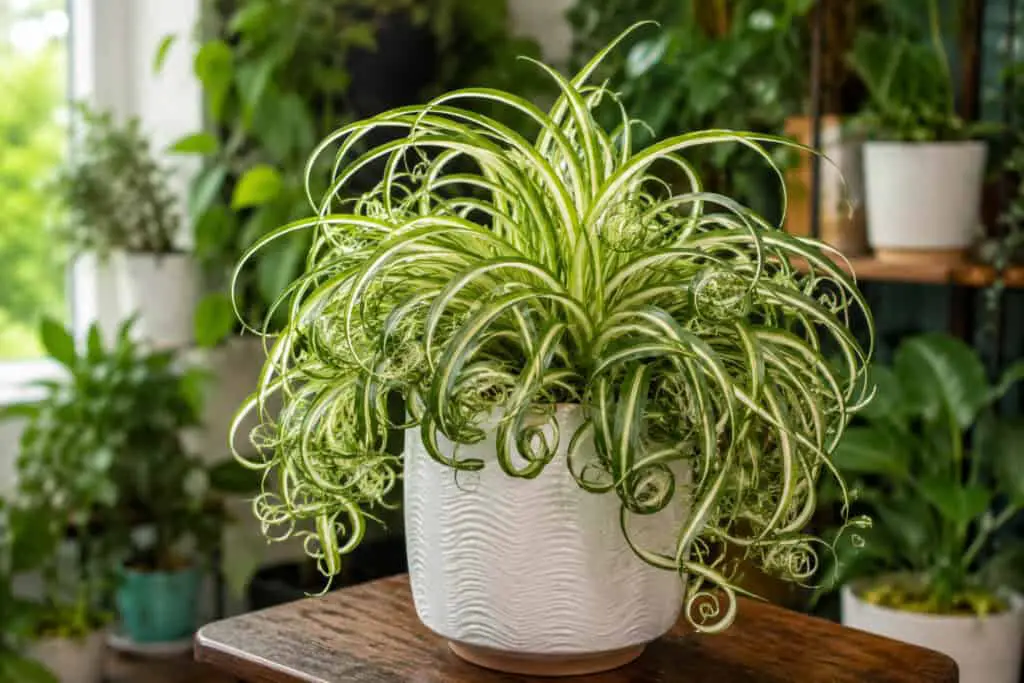
Bonnie spider plant (Chlorophytum comosum ‘Bonnie’) is a compact, curly-leaved houseplant that thrives in bright indirect light, well-draining potting mix, and temperatures between 65 and 75 degrees F.
Water when the top inch of soil is dry, fertilize monthly in spring and summer at half strength, and repot every one to two years.
Critical warning: never allow the plant to sit in standing water, as its fleshy roots rot quickly in soggy conditions.
You brought home a Bonnie spider plant because those tight, spiraling curls looked irresistible in the nursery.
Then three weeks later, you noticed the tips turning brown, the leaves losing their curl, and the whole thing looking vaguely disappointed in you. Sound familiar?
The frustrating part is that most care guides for Bonnie will tell you it’s nearly impossible to kill.
That’s technically true, but it doesn’t mean the plant will thrive under just any conditions.
There’s a real difference between a Bonnie that survives and one that produces dense, bouncy curls with spiderettes dangling in every direction.
This guide goes beyond the basics.
You’ll get the practical reasoning behind every care decision, honest corrections to advice that circulates widely but doesn’t hold up in real growing conditions, and specific visual cues that tell you exactly what your plant needs before a problem becomes a crisis.
What Makes the Bonnie Spider Plant Different
The Bonnie is a cultivar of the standard spider plant (Chlorophytum comosum), but it behaves differently enough that it’s worth treating as its own plant rather than just a curly version of what you already know.
If you want to see how it compares with the other cultivars on the market, our guide to the different types of spider plants breaks down the main varieties side by side.
The key differences matter for care.
It stays compact. A standard spider plant can spread two feet or wider, while Bonnie typically tops out around 8 to 10 inches tall and equally wide, which makes it a far better fit for shelves, bathroom counters and desks.
For context on how the two compare at maturity, see how big a spider plant actually gets.
The curl is a stress response, not just a fixed trait. Each leaf curls because the cells on one side grow at a different rate to the other.
That single fact changes how you should think about watering and light placement, and it is the reason two Bonnies grown side by side can end up looking quite different.
It produces the same runners and spiderettes as its parent species. Because the plant itself is smaller, those runners can look disproportionately long.
That is completely normal. Let them hang and they will develop baby plantlets you can propagate for free.
Light Requirements: What Actually Controls the Curl
Bright indirect light is the standard advice, and it is correct, but most guides stop there without explaining what actually changes at different light levels.
For a full breakdown of light levels and how to measure them at home, see our dedicated guide to spider plant light requirements.
Bright Indirect Light: The Sweet Spot
A spot within 2 to 4 feet of an east- or north-facing window gives Bonnie the ideal balance.
East windows deliver gentle morning sun that the plant handles without stress. North windows provide consistent indirect light throughout the day.
Both produce tight, well-formed curls and healthy variegation on striped varieties.
A south- or west-facing window works well too, provided you keep the plant back from the glass or filter the light through a sheer curtain.
Direct midday sun from south or west exposures will bleach the leaves pale green or cause brown, papery scorch patches that start at the leaf tips and move inward.
Low Light: What You’re Actually Trading
Bonnie tolerates low light, but “tolerates” is doing a lot of work in that sentence.
Growth slows, the white variegation on striped leaves fades toward solid green, and the curl loosens as the plant stretches for more light.
If you want the full picture before deciding whether a dim corner will work, our article on whether spider plants can grow in low light covers exactly what trade-offs to expect.
If your Bonnie’s leaves have gradually gone straighter, check light first, not soil or water.
Moving it to a brighter spot usually restores the curl within four to six weeks of new growth.
If straightening leaves are your main concern, our guide to spider plant leaf curling goes into more depth on the mechanics.
The Curl Secret That Most Guides Miss
| Tip: Why Slightly Dry Soil Produces Tighter Curls Mild moisture stress encourages tighter curling in Bonnie’s leaves. This is not the same as drought stress. Allowing the top inch of soil to fully dry between waterings, rather than keeping it consistently moist, produces noticeably curlier foliage. It’s a real growing technique, not accidental neglect. The catch: if you push it too far and the soil dries out completely for extended periods, you’ll start seeing brown tips and yellowing, which crosses from mild stress into actual damage. |
Watering Your Bonnie Spider Plant
Watering is where most Bonnie problems begin. The plant’s fleshy, tuberous roots store water efficiently, which is what makes it drought-tolerant.
It’s also exactly why overwatering causes damage so quickly: those same roots sit in stagnant moisture and begin to rot before any surface signs appear.
Our guide on how to water a spider plant has a fuller seasonal breakdown if you want more detail than the summary below.
How to Read the Soil
Stick your finger into the soil up to the first knuckle, roughly an inch deep. If you feel moisture at that depth, wait. If it’s dry to the touch, it’s time to water.
In most home environments this works out to watering every seven to ten days in spring and summer, and every twelve to sixteen days in fall and winter when growth slows and evaporation drops.
The soil’s appearance also gives you useful information. Dry potting mix pulls slightly away from the pot edges and lightens in color.
You may notice the entire root ball feels lighter when you pick up the pot. Both are reliable indicators that it’s time to water.
How to Water Correctly
Water thoroughly until water runs freely out of the drainage holes, then stop. Empty the saucer completely within 30 minutes.
Don’t let the pot sit in collected water, even briefly, because the roots will wick that moisture back up and the lower root zone stays saturated long after the surface dries.
This is one of the most commonly ignored pieces of advice in spider plant care, and it’s responsible for a significant portion of the root rot cases people describe online.
The plant looks fine for weeks because the fleshy roots absorb the standing water. By the time the leaves show yellowing or collapse, the rot has already progressed through much of the root system.
If you are already seeing wet-related symptoms, our guide to spider plant overwatering signs will help you confirm what you are dealing with.
Tap Water and Brown Tips: What’s Actually Happening
Bonnie is genuinely sensitive to fluoride and chlorine in tap water.
Both accumulate as salts in the soil over time and cause the tips of leaves to turn brown and crisp, starting at the very tip and moving back toward the leaf base.
If you’re getting persistent brown tips despite correct watering, switch to filtered water, collected rainwater, or water left to sit uncovered overnight, which allows chlorine to off-gas.
Fluoride doesn’t off-gas, so for tap water with high fluoride content, filtered or rainwater is the more reliable fix.
One more cause of brown tips that most guides gloss over: over-fertilizing.
Excess fertilizer salts behave the same way fluoride does, building up in the soil and burning the root tips, which shows up as browning at the leaf tips first.
If you’re using full-strength fertilizer or fertilizing more than once a month during the growing season, dial it back before blaming the water.
For a dedicated walkthrough, see our guide to fixing brown tips on spider plants.
Soil and Pot Selection
Bonnie’s root system is what determines your soil and pot choices, and once you understand the roots, the decisions become obvious.
Our guide to the best soil for a spider plant covers commercial mix options if you would rather buy pre-blended.
The Right Potting Mix
Standard potting soil holds too much moisture for Bonnie’s fleshy roots. A reliable approach is to mix regular potting soil with perlite at a roughly 3:1 ratio.
The perlite creates air pockets in the mix that allow excess moisture to drain and roots to access oxygen between waterings.
If you want to simplify it further: any well-draining indoor potting mix labeled for succulents or tropical plants will work well.
What you’re trying to avoid is a dense, moisture-retaining mix like pure peat, which compacts around the roots and stays wet long after you’ve watered.
Choosing the Right Pot
Terracotta or unglazed ceramic pots are genuinely the best choice for Bonnie because they wick moisture through their walls, creating a slightly drier soil environment that suits the plant’s tuberous roots.
Plastic pots work fine if you’re disciplined about not overwatering, but they leave less margin for error.
Drainage holes are non-negotiable.
If the pot you love doesn’t have drainage holes, use it as a decorative outer pot and keep Bonnie in a plain nursery pot inside it.
Remove the inner pot to water and let it drain completely before returning it.
Pot Size and Root-Bound Behaviour
Bonnie actually performs better slightly root-bound than in an oversized pot.
When given too much soil volume, the unused potting mix stays wet long after you’ve watered, creating exactly the soggy conditions the plant can’t handle.
A pot that’s one size larger than the root ball is enough.
You’ll know it’s time to repot when you see roots growing out of the drainage holes, or when you notice the plant drying out significantly faster than before; our guide on spider plants and being pot bound explains how to judge the timing, and when and how to repot a spider plant walks through the process step by step.
Bonnie Spider Plant Care at a Glance
| Care Factor | Ideal Condition | Tolerates | Avoid |
| Light | Bright indirect, 2-4 ft from window | Low light (with reduced variegation) | Direct midday sun |
| Watering | When top 1 inch of soil is dry | Brief drought periods | Sitting in standing water |
| Soil | Well-draining mix, 3:1 potting soil to perlite | Standard tropical potting mix | Dense peat-heavy mixes |
| Temperature | 65-75 degrees F | 55-80 degrees F | Below 50 degrees F or cold drafts |
| Humidity | 40-60% | Normal indoor humidity | Prolonged very dry air (causes brown tips) |
| Fertilizer | Half-strength balanced feed monthly in spring/summer | No fertilizer if recently repotted | Full-strength or frequent feeding |
| Pot | Terracotta with drainage holes | Plastic with drainage holes | No drainage holes, oversized pot |
Temperature and Humidity
Bonnie is comfortable in the same temperature range most people keep their homes: 65 to 75 degrees F is ideal, and anything between 55 and 80 degrees F is workable.
The problems start at the extremes.
Cold drafts from windows, exterior doors, or air conditioning vents directly damage the leaves, producing brown patches or wilting that looks like overwatering but doesn’t respond to reduced watering.
If your plant is near a window that gets genuinely cold in winter, move it before temperatures drop rather than after you see the damage.
On the heat side, placement near heating vents in winter creates a dry, hot environment that desiccates the leaf tips quickly.
You’ll see brown crisp tips spreading inward faster than normal, and the soil dries out unpredictably between waterings. The fix is distance from the vent, not more frequent watering.
Humidity matters to Bonnie more than most guides acknowledge.
The plant tolerates normal indoor humidity of 40 to 50%, but the leaves respond noticeably to dry air below 30%, which is common in centrally heated homes through winter.
Grouping Bonnie with other houseplants creates a small humid microclimate around all of them, which is a more reliable approach than misting.
Misting the leaves raises humidity for about 20 minutes before evaporating, and repeated misting on foliage with poor air circulation can encourage fungal problems.
Fertilizing: Less Is Genuinely More
Bonnie’s tuberous roots store nutrients between feedings, which means the plant can sustain itself through lean periods far better than most houseplants.
This is why over-fertilizing causes as many problems as under-fertilizing.
A balanced liquid fertilizer at half the recommended strength, applied monthly from spring through early fall, is enough to support healthy growth and spiderette production.
Diluting to half strength matters because full-strength fertilizer applied repeatedly builds up salt residue in the soil, which shows up as brown leaf tips and, in severe cases, root damage.
For a full feeding schedule with specific product guidance, see our article on how to fertilise a spider plant.
Stop fertilizing entirely through winter.
The plant’s growth slows significantly as daylight shortens, and feeding a plant that isn’t actively growing just increases salt accumulation without contributing to growth.
Resume in spring when you see new leaves emerging.
One underreported tip: if you’ve just repotted Bonnie into fresh potting mix, skip fertilizing for two to three months.
Fresh potting soil contains enough slow-release nutrients to support the plant while it settles into its new container, and adding fertilizer on top of that pushes it into over-fertilized territory immediately.
Propagating Bonnie Spider Plant
Bonnie propagates readily enough that most beginners get it right first time.
There are two reliable methods, and our general guide to propagating a spider plant covers both in more depth if you want extra detail.
Method 1: Rooting the Spiderettes
Mature Bonnie plants produce long runners with small plantlets, or spiderettes, at the tips. Wait until the spiderette has developed a few small leaves and visible nub-like root stubs before separating it.
Those root stubs are the plant’s natural starting point and speed up rooting significantly compared to cutting a spiderette before they appear.
- Cut the runner close to the base of the spiderette using clean scissors.
- Place the spiderette in a small container of water with the root nubs submerged but the leaves above the waterline.
- Position in bright indirect light and change the water every three to four days to prevent stagnation.
- Once roots reach 1 to 2 inches in length, transfer to a small pot of moist potting mix.
- Keep the soil evenly moist for the first two to three weeks while the plant adapts to soil-based growing, then resume normal watering.
For water rooting specifically, our guide to propagating spider plants in water covers water-quality and timing details that make the difference between a slow root and a fast one.
Alternatively, pin the runner into a small pot of potting mix while the spiderette is still attached to the mother plant, and cut it free once new growth confirms it has taken root.
This skips the water-to-soil transition entirely and tends to produce a sturdier young plant.
Method 2: Division
If your Bonnie has become crowded or you want to refresh a pot-bound plant, division is the faster method.
Remove the plant from its pot, shake off excess soil to expose the root ball, and gently tease apart separate clumps, each with roots and leaves intact.
Replant each division in its own pot with fresh potting mix.
Spring is the best time for both propagation methods because the plant’s active growth phase gives new roots every advantage to establish quickly.
That said, Bonnie is resilient enough that propagation works reasonably well at any time of year if you can’t wait.
Seasonal Care Adjustments
| Season | Watering | Fertilizing | Light | Other |
| Spring | Increase as growth resumes | Resume monthly at half strength | Move closer to window if needed | Good time to repot and propagate |
| Summer | Every 7-10 days, monitor closely | Monthly at half strength | Filter if near south/west window | Watch for spider mites in heat |
| Fall | Reduce as growth slows | Stop by mid-fall | Maintain current position | Bring outdoor plants inside before 50 degrees F |
| Winter | Every 12-16 days, check soil first | None | Maximize light access | Move away from cold windows and heating vents |
Troubleshooting Common Bonnie Spider Plant Problems
Brown Leaf Tips
This is the single most common complaint, and it’s almost always caused by one of three things: fluoride or mineral buildup from tap water, low humidity, or inconsistent watering.
Start by switching to filtered or rainwater for four to six weeks and see if new growth comes in clean.
If it does, water quality was the issue. If tips continue browning on new leaves, assess humidity levels and watering consistency.
Brown tips that are already there won’t reverse. Trim them off with clean scissors, cutting at a slight angle to mimic the leaf’s natural shape.
This is cosmetic, but it also prevents the dead tissue from continuing to draw resources from the plant.
Full detail in our guide to spider plant brown tips.
Yellow Leaves
Yellow leaves on Bonnie typically point to moisture problems at the root level. Overwatering is the most common cause: the leaves yellow from the base upward, often feeling soft or slightly mushy.
Underwatering causes yellowing that starts at the leaf tips and midrib and the leaves feel papery rather than soft.
Check the root system if you suspect overwatering. Healthy roots are white or light tan and firm.
Rotted roots are brown, mushy, and may smell unpleasant. If you find rot, trim the affected roots with clean scissors, let the roots air out for 30 minutes, and repot into fresh, dry potting mix.
See our guide to spider plant leaves turning yellow for a fuller diagnostic walkthrough.
Leaves Losing Their Curl
Two causes dominate here: insufficient light and consistently moist soil. If the plant has been in a low-light spot, move it closer to a window and give it four to six weeks for the new growth to show the difference.
If light isn’t the issue, let the soil dry slightly more between waterings. The mild stress response drives tighter curling.
Leaves Straightening Under Grow Lights
A specific situation worth addressing separately: if you use a grow light positioned directly above the plant, the leaves often grow upward and straighter toward the light source rather than curling and cascading as they naturally would.
This is phototropism, not a problem with the light itself. Positioning the grow light to the side rather than directly overhead allows the plant to develop its natural arching habit.
Wilting Despite Correct Soil Moisture
This is a genuinely confusing situation and one that trips up experienced growers. If the soil feels correctly moist, no pests are visible, and the plant is still wilting, suspect root rot.
The roots may have lost enough function that even though moisture is present in the soil, the plant can’t absorb it.
Remove the plant from its pot and inspect the roots directly. This is one case where visual confirmation matters more than any surface reading.
If drooping is your main symptom, our guide to spider plant leaves drooping covers the other common causes too.
Pests
Bonnie is generally pest-resistant, but spider mites, aphids, and mealybugs occasionally find it, particularly in hot, dry conditions.
Spider mites produce fine webbing on the undersides of leaves. Aphids cluster on new growth and runners. Mealybugs appear as white cottony masses in leaf joints.
For minor infestations, wipe affected areas with a damp cloth or cotton swab dipped in rubbing alcohol.
For larger infestations, apply insecticidal soap or neem oil, thoroughly covering the undersides of leaves. Repeat every five to seven days for three treatments to break the pest lifecycle.
If you are not sure which pest you are looking at, our comparison of spider mites vs mealybugs on spider plants will help you tell them apart before you treat.
Troubleshooting Quick Reference
| Problem | Likely Cause | How to Confirm | Solution |
| Brown leaf tips | Fluoride/minerals in water, low humidity, salt buildup from fertilizer | Check water source and fertilizing frequency | Switch to filtered or rainwater, reduce fertilizer strength, raise humidity |
| Yellow leaves (soft) | Overwatering or root rot | Check roots: brown and mushy indicates rot | Reduce watering, repot into fresh dry mix if roots are affected |
| Yellow leaves (papery) | Underwatering or too much direct sun | Soil bone dry or bleached leaf surface | Water thoroughly, move away from direct sun |
| Leaves losing curl | Insufficient light or soil too consistently moist | Compare to its previous position; test soil dryness | Increase light, allow top inch of soil to dry fully before watering |
| Wilting with correct soil moisture | Root rot at advanced stage | Remove plant and inspect roots for mushiness | Trim rotted roots, air out, repot in fresh mix |
| White cottony clusters | Mealybugs | Visible in leaf joints and on runners | Rubbing alcohol on cotton swab, follow with neem oil |
| Fine webbing on leaves | Spider mites | Tiny moving dots on leaf undersides | Wipe leaves, apply insecticidal soap every 5-7 days x 3 |
| Pale, washed-out leaves | Too much direct sun | Check placement relative to window | Move to filtered or indirect light |
Is Bonnie Safe Around Cats and Dogs?
Bonnie spider plant is classified as non-toxic to dogs, cats and horses by the ASPCA.
That said, cats are specifically drawn to spider plants because the foliage contains compounds that are chemically similar to mild opioid alkaloids, producing a faint stimulant or hallucinogenic response, which is why many cats chew or bat at the leaves repeatedly.
It is not dangerous in the toxic sense, but ingestion can cause mild gastrointestinal upset such as vomiting or diarrhoea.
If your cat is persistent, a hanging basket or elevated shelf out of reach is the most practical fix. Contact your vet if your cat eats a large quantity or shows unusual distress.
The Honest Reality of Bonnie’s Curls: What Growing Conditions Actually Control
Most care guides present Bonnie’s curling as a fixed genetic trait, as if buying the right plant guarantees the curly look you saw in the nursery.
It doesn’t work that way, and this is worth understanding in detail because it changes how you make care decisions.
The degree of curling in Bonnie’s leaves is genuinely responsive to growing conditions. Light levels, soil moisture, and even pot size all influence how pronounced the curl becomes.
This is why two Bonnie plants grown side by side under different conditions can look noticeably different, even from the same original plant.
The three levers with the most impact are:
- Light intensity: Brighter light produces more compact, tightly curled growth. Lower light causes the leaves to elongate toward the light source, which physically straightens the curl.
- Soil moisture consistency: Mild moisture stress between waterings, allowing the top inch to fully dry, produces noticeably curlier leaves compared to consistently moist soil. The mechanism is the same one that causes leaves to curl when the plant is drought-stressed, just at a much milder, controlled level.
- Fertilizer concentration: Well-fed plants with abundant nitrogen produce lusher, slightly straighter leaf growth. This is the basis of the counterintuitive observation that a slightly neglected Bonnie sometimes looks curlier than a perfectly maintained one.
None of this means you should deliberately stress your plant.
The goal is understanding that these three factors interact, so if your Bonnie isn’t as curly as you expected, the answer is almost never the plant itself.
Growing Bonnie in British Homes
Bonnie spider plant is rated H1C by the RHS, meaning it grows indoors year-round throughout the UK but will not survive outdoors except in the most sheltered spots in the mildest UK zones.
UK homes with central heating tend to lose humidity through winter, which raises the odds of brown tips; a pebble tray or grouping with other houseplants helps counter that.
UK winter days are also shorter and dimmer than in many other regions, so keeping Bonnie within 2 feet of a window through the colder months compensates for reduced light intensity.
If you are considering a summer spell outdoors, our guide to whether spider plants can live outdoors covers what conditions make that safe.
Frequently Asked Questions
How often should I water my Bonnie spider plant?
Water your Bonnie spider plant when the top inch of soil is dry to the touch, which typically works out to every seven to ten days in spring and summer and every twelve to sixteen days in fall and winter.
This isn’t a fixed schedule because variables like pot size, light levels, humidity, and pot material all affect how quickly the soil dries.
Checking the soil directly rather than following a calendar gives you a more accurate read on what the plant actually needs.
When you do water, water thoroughly until it drains freely from the drainage holes, then empty the saucer.
Why are the leaves on my Bonnie spider plant turning brown at the tips?
Brown tips on Bonnie spider plants are almost always caused by one of three things: fluoride or mineral accumulation from tap water, low ambient humidity, or salt buildup from over-fertilizing.
The tips brown first because they’re the farthest point from the roots and receive nutrients and moisture last, making them the first to show stress.
Switching to filtered or rainwater resolves most tap water issues within a few weeks of new growth.
Increasing humidity by grouping plants together or using a pebble tray helps with dry air.
If you’ve been fertilizing at full strength or more often than monthly, reducing to half strength and flushing the soil with clean water once a month removes salt accumulation.
Brown tips that are already there won’t revert, but trimming them at an angle and addressing the root cause prevents continued browning on new growth.
Why are my Bonnie spider plant’s leaves losing their curl?
The two most common causes of straightening leaves in Bonnie are insufficient light and consistently moist soil.
When the plant doesn’t receive enough light, its leaves grow toward the light source and elongate, which physically reduces the curl.
Moving the plant to a brighter spot with indirect light typically restores curlier growth within four to six weeks as new leaves emerge.
If light isn’t the issue, consider whether the soil stays consistently moist between waterings.
Allowing the top inch to dry out fully before watering again introduces mild moisture stress that actually encourages tighter curling.
If you’re using a grow light positioned directly overhead, try moving it to the side of the plant, as overhead lighting triggers upward growth that straightens the leaves.
Is Bonnie spider plant safe for cats and dogs?
Bonnie spider plant is listed as non-toxic to cats, dogs, and horses by the American Society for the Prevention of Cruelty to Animals.
However, cats are specifically drawn to the plant because it contains compounds similar in structure to mild opium alkaloids, which produce a faint hallucinogenic effect.
This is why cats often chew on spider plants more persistently than other houseplants. While not poisonous, ingestion can cause mild gastrointestinal upset, typically vomiting or loose stools.
For households with cats that are persistently interested in the plant, placing Bonnie in a hanging basket or on a high shelf out of reach is the most practical solution.
If your cat eats a large amount or shows unusual symptoms, contact a veterinarian.
How do I propagate my Bonnie spider plant?
Bonnie spider plants propagate naturally by producing spiderettes, which are miniature plantlets that develop on long, trailing runners extending from the mother plant.
Wait until the spiderette has developed visible root nubs before cutting it free, as these give it a head start when rooting.
You can root the spiderette in water, submerging only the root nubs and keeping the leaves above the waterline, then transplant to soil once roots reach one to two inches.
Alternatively, pin the runner with the spiderette into a small adjacent pot of potting mix while it’s still attached to the mother plant.
This method skips the water-to-soil transition and typically produces sturdier young plants. Cut the runner only after new growth confirms the spiderette has taken root.
Division of a large parent plant is also effective: remove the plant from its pot, separate the root ball into clumps with both roots and leaves, and repot each division individually.
How often should I repot my Bonnie spider plant?
Repot Bonnie every one to two years, or sooner if you notice roots growing through the drainage holes or the plant drying out unusually fast between waterings.
Bonnie performs well slightly root-bound, so there’s no urgency to repot at the first sign of crowding, but dense root growth will eventually restrict the plant’s ability to absorb water efficiently.
When repotting, move up only one pot size, typically two inches larger in diameter than the current pot.
Going too large at once leaves excess soil volume that stays wet and creates the conditions for root rot.
Spring is the best time to repot because the plant’s active growth phase helps it establish quickly in the new container.
Can I grow Bonnie spider plant in low light?
Yes, Bonnie spider plant tolerates low light conditions, but there are real trade-offs that most guides understate.
In low light, growth slows significantly, and the white variegation on striped varieties fades as the plant produces more chlorophyll to compensate for reduced light.
The curl also loosens as the leaves reach toward the light source. For a plant that’s still alive but visibly declining, low light is survivable.
For a plant that produces tight curls, healthy variegation, and regular spiderettes, bright indirect light is genuinely necessary.
If a bright spot isn’t available near a window, a quality grow light positioned to the side of the plant for eight to ten hours daily can substitute effectively.
Why is my Bonnie spider plant not producing spiderettes?
Several conditions need to be in place before Bonnie begins producing spiderettes.
The plant generally needs to be at least moderately mature, roughly a year or more old, and slightly root-bound in its pot.
Excess fertilizer, particularly high-nitrogen feeds, can push the plant into leaf production at the expense of spiderette development.
Insufficient light also reduces spiderette production because the plant lacks the energy reserves to support both its own growth and runner production.
The most reliable approach is to ensure the plant is in bright indirect light, fertilize at half strength with a balanced fertilizer rather than a high-nitrogen formula, and allow it to become slightly root-bound before repotting.
If the plant is currently producing no runners at all, check light first, then fertilizer, then pot size.
Key Takeaways
- Check soil moisture before watering, every time. Insert your finger an inch into the soil. If it feels dry, water thoroughly. If it feels moist, wait. Following a fixed watering calendar ignores the actual state of the soil and is the leading cause of Bonnie problems.
- Empty the saucer after every watering. Bonnie’s fleshy roots will wick up standing water from the saucer and stay wet long after the surface has dried, creating root rot conditions that show up as yellowing leaves weeks later.
- Bright indirect light produces the best curls. If leaves are straightening or losing their variegation, move the plant to a brighter spot before adjusting anything else.
- Switch to filtered or rainwater if you’re seeing persistent brown tips. This addresses fluoride and chlorine sensitivity, which is specific to spider plants and more significant than most guides acknowledge.
- Fertilize at half strength, monthly, spring through early fall only. Full-strength fertilizer accumulates salts that cause the same brown tip symptoms as tap water minerals.
- Allow the top inch of soil to fully dry between waterings for tighter curls. Mild moisture stress between waterings is a real technique for encouraging curlier foliage, not accidental neglect.
- Bonnie likes being slightly root-bound. Don’t repot just because the roots look full. Wait until you see roots at the drainage holes or notice unusually fast drying, then move up by one pot size only.
- For propagation, wait until spiderettes show root nubs before cutting. Those small root stubs significantly speed up the rooting process and give the young plant a better start.
Final Thoughts
There’s something specific that happens when a Bonnie spider plant is genuinely thriving: the runners extend in every direction, the new leaves unfurl already curled tight, and the whole plant has a density and bounce to it that looks different from a plant that’s merely surviving.
That distinction is mostly a matter of light and watering discipline.
Most people who struggle with Bonnie are either watering on a schedule instead of reading the soil, or they’ve placed the plant in a spot that’s not quite bright enough and written off the gradually straightening leaves as normal.
Both are easy to correct once you know what to look for.
The plant is genuinely forgiving. But forgiving doesn’t mean indifferent. Adjust one variable at a time and it will respond visibly within a few weeks of new growth, which is part of what makes it such a satisfying plant to grow.
If you would like a broader refresher on care basics beyond Bonnie specifically, our main spider plant care guide is a good next stop.
| What’s Next: Propagate Your Spiderettes If your Bonnie is producing runners with spiderettes, that’s your immediate next step. Wait until the plantlets show small root nubs, then try rooting one in a glass of water on a bright windowsill. Within two to three weeks you should have a rooted young plant ready for its first pot. It’s the fastest way to build your plant collection for free, and sharing plantlets is one of the best parts of growing spider plants. |
Mariel is a plant enthusiast and writer based in the UK with a passion for houseplants and indoor growing.
She has spent the last few years building an ever-growing collection of indoor plants and learning the hard way which ones will survive her busy schedule.
At Bean Growing she writes about houseplant care, common plant problems, and outdoor gardening.