
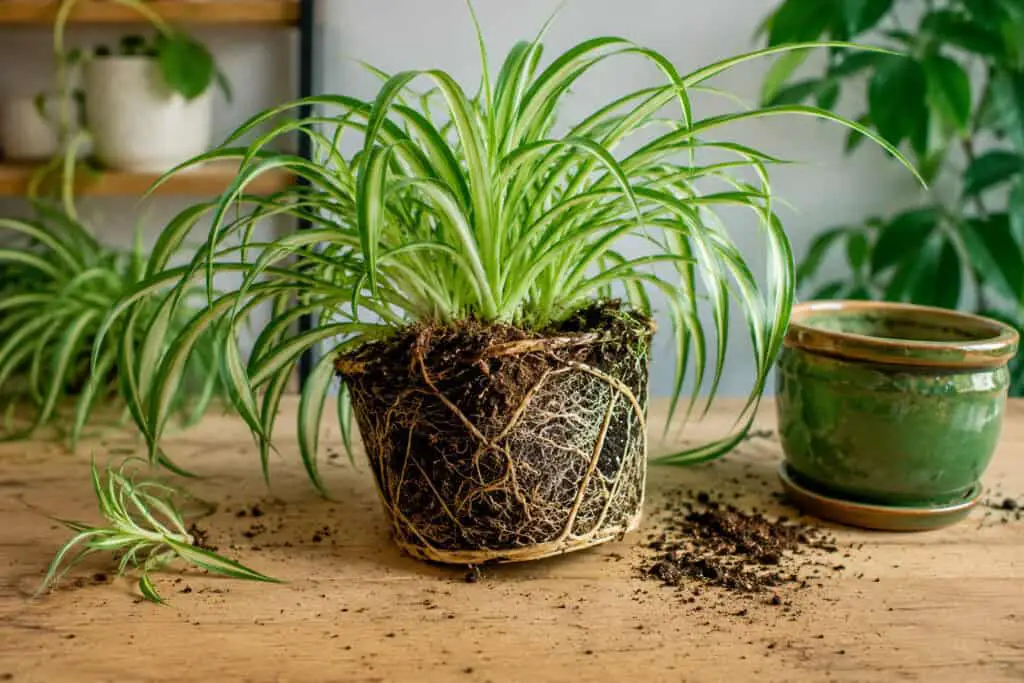
A spider plant (Chlorophytum comosum) is pot-bound when its roots have filled the container and can no longer absorb water or nutrients efficiently.
Key signs include roots emerging from drainage holes, soil drying out within hours of watering, the plant lifting out of its pot, and visible tubers pushing above the soil surface.
Repot into a container only 1 to 2 inches wider, ideally in spring or early summer.
You water your spider plant, and the water drains straight through the pot in seconds. Leaves that used to arch with energy start looking a little flat, a little pale.
Maybe you spot a thick white root curling out from the bottom drainage hole. You start thinking something is wrong with your watering routine, or your potting mix, or the light.
And then someone mentions the words “root bound” and suddenly everything makes sense.
Spider plants are one of the most rewarding houseplants you can grow, partly because they are genuinely hard to kill and partly because they communicate clearly once you know what to look for. Our spider plant care guide covers the fundamentals if you want the bigger picture, but this article focuses specifically on one issue.
A pot bound spider plant does not just slow down quietly. It gives you a sequence of very specific, readable signals.
The trick is knowing how to interpret them correctly, because some signs are obvious and others get misread as completely different problems.
This guide walks you through every pot bound sign a spider plant produces, explains why each one happens, and helps you decide when you actually need to act.
Because here is the nuance most guides leave out: spider plants tolerate being pot bound better than almost any other common houseplant, and rushing to repot too early can cause more trouble than leaving them alone.
What ‘Pot Bound’ Actually Means for a Spider Plant
A plant is pot bound when its root system has expanded to fill the entire container with little to no remaining soil space. In most houseplants this is straightforwardly a problem.
With spider plants it is a little more complicated, and that complexity is worth understanding before you start reaching for a bigger pot.
Chlorophytum comosum has two distinct types of roots working below the soil surface. The first are fine fibrous feeder roots that absorb water and dissolved nutrients.
If you’re growing one of the many varieties of spider plant, this root structure is consistent across the species.
The second are thick, white, fleshy tubers. These tubers are water-storage organs, an adaptation the plant developed in its native southern Africa where rainfall can be unreliable for extended periods.
Those fat white roots you find when you unpot a spider plant are not a sign something went wrong.
They are supposed to be there.
The distinction matters because a spider plant in a tight pot is often still functioning reasonably well thanks to its tuber reserves.
It is pulling from stored resources even when the soil has little left to offer. This is why spider plants can look surprisingly healthy even when they are severely pot bound.
They are drawing on their own internal water supply. But that reserve has limits, and once the root ball is too dense to take up water efficiently through the soil at all, the plant starts showing stress in recognisable ways.
| Tip: The Sweet Spot Between Pot Bound and Overpotted Spider plants actually produce more pups (spiderettes) when they are slightly pot bound. The mild stress of a snug container triggers the plant to reproduce, and once you have pups to spare, propagating spider plant pups is straightforward. This means a spider plant that is a little cramped is often healthier and more productive than one given an oversized pot. The goal is not to eliminate pot-boundness entirely, but to catch it before it crosses from productive stress into genuine root damage. |
The Visible Signs Your Spider Plant Is Pot Bound
These are the signs you can observe without touching or moving the plant. Check for these first before doing anything else.
Roots Growing Out of the Drainage Holes
This is the most widely known sign, and it is reliable.
When the root ball has completely filled the container, roots begin growing toward the nearest exit, which is usually the drainage holes at the base.
In a hanging basket these are easy to spot just by looking underneath. In a pot sitting on a saucer you may need to tip it slightly or check directly underneath.
One or two thin roots threading through a drainage hole is a mild indicator worth monitoring.
A dense cluster of thick white roots actively growing down from the base of the pot is a clear signal that repotting is overdue.
If those roots have started coiling around the underside of the pot because they have nowhere else to go, act soon.
Roots or Tubers Visible at the Soil Surface
When the root ball has no more room to expand downward or outward, the thick tubers begin pushing upward.
You will see pale white, carrot-shaped swellings appearing at or just above the soil surface, sometimes lifting the entire plant visibly higher in the pot.
This happens because the soil has largely been displaced by roots at the lower depths of the container, forcing new growth to head toward the surface.
A common beginner mistake is to assume these visible tubers indicate disease or a watering problem. They do not.
They are simply showing you that the plant has run out of space underground. The tubers themselves should be firm and white or pale cream.
If they look brown, soft, or shrivelled, that is a separate problem related to root rot or drought stress rather than pot-boundness alone.
The Plant Sitting High in Its Pot
If your spider plant appears to be rising out of its container over time, that is not an optical illusion.
Dense root and tuber growth at the base of the pot physically pushes the plant upward.
You may notice gaps appearing between the soil surface and the rim of the pot, or the root ball visibly protruding above the soil line.
This sign tends to appear alongside surface tuber emergence. When you see both together, the plant has been pot bound for some time and repotting becomes genuinely urgent.
Plastic Pots Bulging or Cracking
Spider plant roots generate considerable physical pressure as they expand.
Thin plastic nursery pots in particular can visibly bulge outward at the sides or develop hairline cracks along the seams.
Some growers discover a terracotta pot with a crack they cannot explain, not realising the roots caused it.
If your pot has started to look slightly barrel-shaped or you notice a new crack in a ceramic pot, check the roots.
This sign means the plant has been pot bound for a while and the pressure has been building over multiple growing seasons.
The Watering and Growth Signs That Are Easy to Misread
These signs are just as important as the visible root indicators, but they are much more frequently blamed on something else.
If you are seeing any of these alongside the physical signs above, the combination strongly points toward a pot bound plant.
Water Runs Straight Through the Pot
When the root ball becomes dense enough, it starts to repel water rather than absorb it.
You pour water in, and within seconds it appears at the drainage hole, apparently having passed straight through. If this sounds familiar, it’s worth comparing against our guide on how to water a spider plant correctly to rule out a watering-technique issue before assuming the roots are the cause.
Many growers assume at this point that their potting mix has become hydrophobic, and they reach for products to restore water retention.
That sometimes helps temporarily, but if the underlying cause is a severely pot bound root system, soil amendments will not solve the problem.
What is happening mechanically: the root mass has become so tightly packed that water follows the path of least resistance along the edges of the pot and down through any remaining air gaps rather than soaking into the root ball itself.
The plant can end up thirsty even after regular watering, which leads to the next sign.
Soil Drying Out Faster Than Usual
A pot bound spider plant dries out noticeably faster than the same plant did in the same pot six months earlier.
There are two reasons for this. First, the ratio of root mass to soil volume has shifted dramatically, meaning there is far less soil to hold water in reserve.
Second, if the plant is drawing heavily on stored root moisture between waterings, the overall moisture level in the container drops faster.
Growers in hot, dry climates or those who keep their plants near a heat source will notice this sign accelerate during summer.
What used to need watering every seven to ten days may suddenly need attention every three to four days.
Track this change as a meaningful indicator rather than dismissing it as seasonal variation alone, because seasonal temperature increases can explain faster drying but rarely to the same degree a severely pot bound plant shows.
Stunted Growth or No New Leaves
Spider plants in good conditions push out new growth from the centre of the plant steadily through the growing season.
A pot bound plant often slows or stops this central growth, not because it is unhealthy but because the resources available through the root system can no longer sustain rapid expansion.
If your plant has stalled altogether, our guide to why a spider plant stops growing covers the other common causes alongside pot-boundness.
The nuance here is important.
A spider plant that has slowed growth but is still producing pups is doing something intelligent: it is investing available resources in reproduction rather than leaf production, which makes sense for a stressed plant.
Pups are also how you make the plant fuller over time, so if you want a bushier spider plant, a snug pot is actually working in your favour.
A plant that has stopped producing both new leaves and pups simultaneously is showing a more serious resource shortage and likely needs repotting soon.
If you are interested in how to propagate the pups your spider plant produces, growing spider plant babies from spiderettes covers the full process, and our guide to propagating spider plants in water is a good alternative if you’d rather watch the roots develop before potting up.
Wilting Despite Regular Watering
This one genuinely confuses people.
A pot bound spider plant can wilt and look dehydrated even directly after watering, because the water is not actually penetrating the root ball effectively.
The leaves lose their characteristic slight arch and may look limp or thin, particularly in the outer portion of the rosette.
This is a different mechanism from the more common causes covered in our spider plant leaves drooping guide, so it’s worth checking the roots before changing your watering schedule.
Checking the soil an hour after watering and finding it still dry in the centre of the pot while the edges are slightly damp is a diagnostic moment: the root mass is deflecting water rather than absorbing it.
How to Confirm Your Spider Plant Is Pot Bound
Observation from the outside gives you strong clues, but a brief physical check resolves any doubt.
- Water the plant thoroughly and wait 24 hours. This makes the root ball easier to work with and reduces the risk of root damage during inspection.
- Lay the pot on its side on a flat surface. Support the plant with one hand and gently slide or tap the pot off with the other. If the pot resists, run a thin knife or old chopstick around the inside edge to break the seal.
- Look at the shape of the root ball. A moderately pot bound plant will hold the shape of the container when removed, with roots visible around the outer surface.
A severely pot bound plant will reveal a dense, almost solid mass of white tubers and fibrous roots with very little remaining soil visible.
The roots will be circling, crossing, and pressing against each other.
Check the centre of the root ball. If you can press your finger into the centre of the mass and feel actual soil, the plant still has some time.
If the centre is as dense and root-packed as the outside, it needs repotting.
| Tip: The Tilt-and-Tap Method Never yank a spider plant out by its leaves or stems. The tuberous roots sit just below the crown and pulling from above can snap the connection between stems and roots. Tilt the pot, tap the base firmly two or three times, and ease the root ball out by supporting it from below. With a severely pot bound plant the whole root mass will slide out in one solid piece. |
When Spider Plants Actually Need Repotting (and When They Do Not)
This is where most guides give you an oversimplified rule: repot every one to two years.
The reality is more nuanced, and getting this wrong in either direction costs you.
Repotting too early moves a plant that was functioning well into a larger container with more soil than its current root system can use.
Excess soil retains moisture the roots are not absorbing, which creates conditions for root rot.
Spider plants are particularly vulnerable to root rot in soggy soil because their fleshy tubers are prone to bacterial decay when sitting in waterlogged conditions.
Repotting too late means the plant exhausts its resources, stops growing, begins wilting despite regular care, and can suffer long-term structural root damage from the physical pressure of compaction.
The honest answer is: repot when you see multiple signs from the sections above occurring simultaneously.
One sign alone is usually not enough. Three or more signs together, especially the combination of fast-draining soil, surface tubers, and slowed growth, is a clear mandate to repot.
| Sign | Urgency Level | Action |
| Roots just visible at drainage holes | Low | Monitor; no action needed yet |
| Soil drying out faster than 6 months ago | Low to moderate | Check roots; prepare for repotting |
| Tubers visible at soil surface | Moderate | Plan repotting within 4 to 8 weeks |
| Water runs straight through; wilting after watering | High | Repot within 1 to 2 weeks |
| Plant lifted from pot; pot cracking or bulging | Urgent | Repot immediately |
The One Sign Most Guides Miss: Salt and Mineral Crust on the Soil
Almost no beginner guide mentions this, but it is a real and useful indicator.
When a spider plant has been in the same pot for an extended period, especially in a pot bound state where water runs through quickly rather than soaking evenly, mineral deposits from tap water and fertiliser build up on the soil surface.
You will see this as a white or pale grey crusty layer forming on top of the potting mix, sometimes extending up the inner rim of the pot.
This crust tells you two things simultaneously. First, the plant has been in this soil long enough for salts to accumulate.
Second, water has not been soaking through evenly for a while, because even distribution of water would prevent localised salt concentration.
Spider plants are sensitive to fluoride and other minerals found in tap water, and accumulated salts can cause brown leaf tips even in a plant that appears otherwise healthy.
If yellowing rather than browning is what you’re seeing, our guide to spider plant leaves turning yellow covers that separate set of causes.
If you see salt crust on the soil surface combined with any two other signs from the sections above, it is a reliable signal that both the root space and the soil medium have reached the end of their useful life.
Repotting resolves both problems at once by giving the roots fresh space and replacing the depleted, salt-laden medium with fresh potting mix.
For more detail on managing brown tips in spider plants, caring for a spider plant with brown tips covers the full range of causes and solutions.
Timing Your Repot: When in the Year to Act
The physical signs tell you that your spider plant needs repotting. The calendar tells you when to do it safely.
Spring, from March through May, is the best window.
The plant is entering its active growth phase, which means it will recover quickly, push new roots into fresh soil rapidly, and adapt to the change with minimal setback.
The combination of longer days and warming temperatures acts like a natural recovery boost.
Early summer works almost as well as spring.
The plant is in full growth mode and has the energy reserves to handle repotting with minimal shock.
Late summer and fall are poor timing unless the situation is urgent.
Growth is slowing, and a repotted plant settling into new soil during a low-energy period recovers more slowly and is more vulnerable to overwatering in the enlarged container.
Winter repotting should only happen if the plant is showing severe stress that cannot wait.
Move it into fresh soil, keep it on the dry side of normal watering, and expect slow recovery until spring.
UK Reader Note: Timing for UK Growers
In the UK, spring repotting windows align with the period from late March through May, when indoor temperatures begin to rise consistently and daylight hours extend noticeably.
Spider plants kept on north-facing windowsills in the UK may need slightly longer recovery time after repotting due to lower overall light levels compared to US equivalents.
If low light is a permanent feature of the room rather than a seasonal one, it’s worth checking whether spider plants can grow in low light long-term, since that affects how often the plant will need repotting at all.
The RHS recommends lifting a plant from its container to check for congested roots whenever growth stalls or the compost dries out unusually fast, which aligns with the guidance above (RHS: How to repot a plant).
Choosing the Right New Pot Size
The single most common repotting mistake with spider plants is choosing a pot that is too large. It feels logical: if the roots are cramped, give them lots of space.
But a pot that is significantly larger than the root ball traps moisture in all that extra soil, and spider plants are genuinely susceptible to root rot in those conditions.
Pairing the right pot size with the right potting mix for a spider plant matters just as much as the size increase itself.
Go one size up, which typically means a pot 1 to 2 inches wider in diameter than the current one.
If you are moving from a 6-inch pot, a 7 or 8-inch pot is right. A 10 or 12-inch pot is not, even if it looks impressive.
Pot material matters too. Unglazed terracotta is an excellent choice for spider plants because it breathes, allowing excess moisture to evaporate through the walls.
Plastic retains moisture longer, which requires more careful watering discipline to avoid overwatering in the larger container.
Glazed ceramic sits between the two. Any material works, but drainage holes are non-negotiable.
If your decorative pot has no holes, use it as a cachepot and sit a plastic nursery pot with holes inside it.
Troubleshooting: Pot Bound Signs vs. Other Problems
Several pot bound symptoms overlap with problems that have completely different causes. This table helps you distinguish between them.
| Problem | Likely Cause | How to Confirm | Solution |
| Water drains immediately | Pot bound root mass or hydrophobic soil | Remove plant; inspect root density | Repot if root bound; soak pot if hydrophobic soil only |
| Wilting despite watering | Pot bound or root rot | Check roots: firm white = pot bound; brown soft = root rot | Repot with fresh soil; trim rotted roots if present |
| No new leaves or pups | Pot bound, low light, or underfeeding | Check roots and light levels together | Repot if multiple pot bound signs present; assess light |
| Brown leaf tips | Salt build-up, fluoride in water, or low humidity | Check for salt crust on soil; consider water source | Repot to refresh soil; switch to filtered or rainwater |
| Plant sitting high in pot | Pot bound tuber expansion | Visible tubers and roots at soil surface | Repot promptly; do not push plant back down |
Warning: Spider Plants and Cats
Spider plants (Chlorophytum comosum) are classified as non-toxic to cats and dogs by the ASPCA, which makes them a popular choice in pet households.
However, the plant contains mild compounds that can have a slightly hallucinogenic effect on cats, and many cats are strongly attracted to the leaves.
Ingestion of large amounts can cause mild vomiting or digestive upset.
Keep the plant out of reach of cats who are persistent chewers, not because of serious toxicity risk, but because heavy leaf damage stresses the plant and can introduce bacteria through damaged tissue.
Frequently Asked Questions
Do spider plants like to be pot bound?
Yes, spider plants prefer slightly pot bound conditions and actively perform better in them up to a point.
A mildly cramped root system triggers the plant to produce more pups (spiderettes) as a stress response, which is why pot bound spider plants often look prolific.
The important distinction is between mildly pot bound, which the plant handles well, and severely pot bound, where the root mass has displaced most of the soil and the plant can no longer absorb water efficiently.
The goal is not to keep the plant permanently cramped but to allow a degree of root fullness before moving up to the next pot size.
How do I know when my spider plant is too root bound to wait?
The clearest combination of signs that indicates urgent repotting is water running straight through the pot without being absorbed, the plant wilting or looking flat within a day or two of watering, and visible tubers or roots pushing above the soil surface.
Any one of these alone is a moderate signal.
All three together means the root system has overwhelmed the container’s capacity to support the plant, and waiting risks the plant drawing down its stored tuber reserves to a point of genuine stress.
In practice, if you pick up the pot and it feels unusually light immediately after watering, that is another strong confirmation that very little soil moisture is being retained.
How often should I repot a spider plant?
The commonly cited rule is every one to two years, but this is only a starting point.
Spider plants in bright, warm conditions with consistent fertilising during the growing season may need repotting annually because they grow faster under those conditions.
Our guide on how to fertilise a spider plant covers how feeding schedule interacts with growth rate and, indirectly, how quickly the roots fill a pot.
Spider plants in lower light with infrequent feeding grow more slowly and may comfortably stay in the same pot for two to three years.
The most reliable approach is to observe the signs covered in this article rather than following a calendar schedule.
A healthy spider plant in a pot it has not yet filled does not need repotting even if it has been two years.
Can a pot bound spider plant recover without repotting?
A mildly pot bound spider plant can be managed for a period without repotting by watering more frequently and bottom-watering occasionally, which forces water up through the root mass from below and saturates the root ball more thoroughly than top-watering.
Fertilising during the growing season also helps compensate for depleted soil nutrients.
However, these are management strategies, not solutions.
A severely pot bound plant where the root mass has completely displaced the soil will continue to decline without repotting regardless of how carefully it is watered.
Bottom-watering is a useful tool for extending the time between repots but not a permanent substitute.
What size pot should I move my spider plant into?
Choose a pot that is 1 to 2 inches wider in diameter than the current container.
This gives the roots fresh soil to grow into without providing so much extra volume that water pools in unused soil and creates root rot risk.
Spider plants grow relatively quickly once given fresh space, so a modest size increase is sufficient.
Moving directly from a 6-inch pot to a 12-inch pot is a common mistake that often leads to overwatering damage within the first few months, because the small root ball cannot dry out the large soil volume at the pace it needs to.
When in doubt, go smaller rather than larger.
Should I break up the root ball when repotting a pot bound spider plant?
For a moderately pot bound plant, gently loosening the outer roots with your fingers is sufficient. This encourages the roots to grow outward into the new soil rather than continuing to circle.
On the other hand, a severely pot bound plant with roots tightly matted in circles, you may need to use a tool to score the root ball two or three times vertically around the outside, or use scissors to cut through the outermost circling roots.
This sounds counterintuitive but stimulates new root growth.
Removing up to one-third of the outer root mass during repotting is acceptable for a healthy plant and will not cause lasting damage if done during the active growing season.
Can I divide a pot bound spider plant instead of repotting it?
Yes, and for a severely pot bound specimen this is often the better choice.
Dividing the plant into two or three sections gives each division a manageable root ball that will recover quickly in fresh soil, and you end up with multiple healthy plants instead of one overstressed one.
Each division needs its own crown of leaves and a healthy share of roots.
Pot each section into a container appropriate for its root ball size, not a large pot, and keep them consistently moist for the first two to four weeks while new roots establish.
The mother plant’s divisions typically recover faster than a single overgrown root ball would after a straightforward repot.
Why does my spider plant wilt right after watering if it is pot bound?
When a spider plant root ball is severely compressed, water poured from above travels along the path of least resistance, which is usually down the gap between the root ball and the pot wall and out through the drainage hole, rather than being absorbed by the roots themselves.
The plant receives very little of the water you apply even though it appears to have been watered.
This is why wilting can occur within a day or two of what seemed like a thorough watering.
The fix is to bottom-water the plant by placing it in a few inches of water for 30 to 60 minutes to allow the root ball to absorb moisture slowly, or to repot into fresh soil that the roots can actually interact with.
Key Takeaways
- Check the base of the pot regularly. Roots emerging from drainage holes are the earliest and most reliable sign your spider plant is becoming pot bound.
- Pay attention to watering behaviour. If the pot is drying out significantly faster than it did a few months ago, the root-to-soil ratio has shifted, and the plant is approaching the point where it needs repotting.
- Look for tubers at the soil surface. Pale white swellings pushing up through the potting mix mean the root system has displaced most of the soil below and the plant is running low on accessible growing medium.
- Water running straight through the pot combined with wilting is an urgent signal. Bottom-water immediately as a temporary measure and plan repotting within one to two weeks.
- Do not repot at the first sign of crowding. A mildly pot bound spider plant produces more pups and manages well. Wait for multiple signs to appear together before acting.
- Always go one size up, not several. A 1 to 2 inch increase in pot diameter is the right move. A much larger pot holds too much moisture and creates root rot risk.
- Spring is the best repotting window. March through May gives the plant the active growth energy it needs to establish quickly in fresh soil.
- Salt crust on the soil surface is a useful secondary indicator. Combined with other signs, it tells you the soil medium is exhausted and needs replacing regardless of pot size.
In Summary
The reason so many growers misread a pot bound spider plant is that it looks deceptively fine for a long time.
Those tuberous roots are doing exactly what they evolved to do, storing water and sustaining the plant through conditions that would stress a less adaptable houseplant.
But there is a threshold, and once the root mass has overwhelmed the container, the cues become clear and consistent.
What started as a mystery, why the water disappears so fast, why the leaves look slightly wrong, why the soil seems to evaporate between waterings, resolves into a straightforward picture once you know what to look for.
The roots have simply outgrown the space. The fix is one of the easiest tasks in houseplant care.
The best spider plant growers are not the ones who repot on a rigid schedule.
The best spider plant growers observe their plants closely. They catch the signs early and act at the right time of year. They also choose the right sized pot.
That combination means the plant spends less time recovering. It spends more time doing what spider plants do best. It grows steadily, produces pups, and makes every windowsill look better.
What’s Next
You can now spot the signs of a pot bound spider plant. The next step is learning how to repot it safely: our guide to how and when to repot a houseplant works through the full process step by step, including how to handle a severely matted root ball and which potting mix gives the best drainage.
If you grow other houseplants prone to the same issue, a root bound Monstera shows the same signs playing out in a very different root system, which is a useful comparison if you’re building a broader sense of how pot-bound stress shows up across species.
Mariel is a plant enthusiast and writer based in the UK with a passion for houseplants and indoor growing.
She has spent the last few years building an ever-growing collection of indoor plants and learning the hard way which ones will survive her busy schedule.
At Bean Growing she writes about houseplant care, common plant problems, and outdoor gardening.