
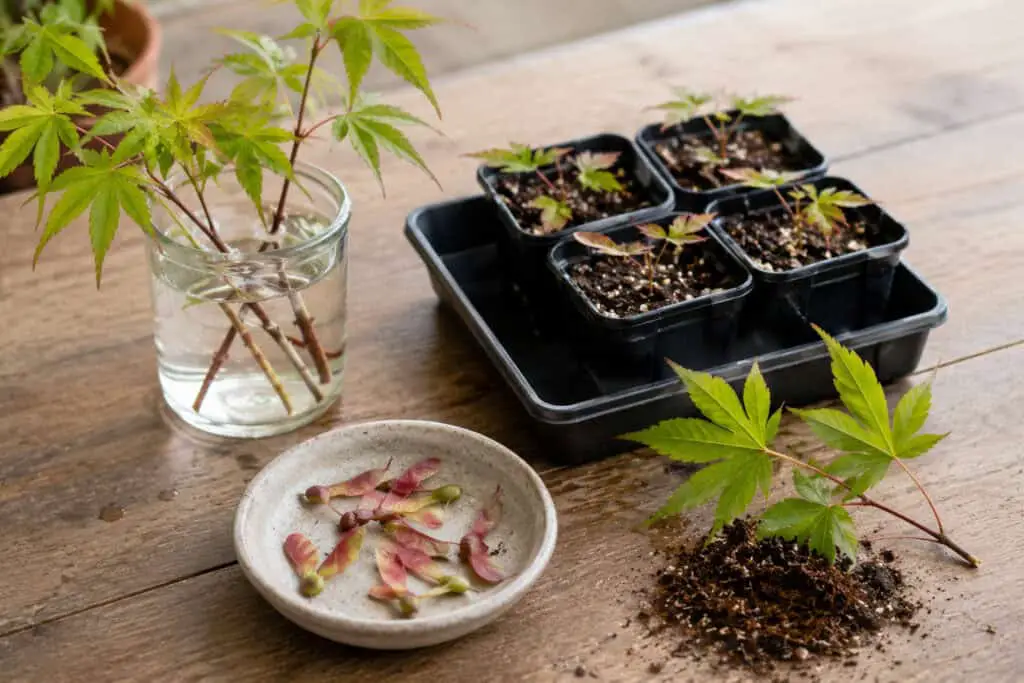
Propagating an Acer tree is one of the most rewarding projects an ornamental gardener can take on.
A single parent tree can become the starting point for dozens of new trees, whether it is a prized Japanese maple cultivar or a seed-grown field maple.
I have taken cuttings from my own Bloodgood Japanese maple more than once, and I still lose more than I keep. That is normal for this genus, not a sign you are doing it wrong.
It is also one of the more misunderstood areas of maple growing, and the two main routes, cuttings and seed, behave very differently. They have different success rates, and they suit different goals.
Acer propagation from cuttings is the only way to guarantee an identical copy of a named cultivar.
Think of varieties like Bloodgood, Crimson Queen, or Sango Kaku. But it is a genuinely difficult technique, and even experienced growers only see a modest success rate.
Growing an Acer tree from seed is far easier and more reliable, but the resulting tree will not be identical to its parent. Named cultivars in particular will not come true from seed.
This guide covers how to propagate an Acer tree using both methods. It includes softwood, semi-ripe, and hardwood cuttings, plus seed collection, cold stratification, sowing, and aftercare.
Whether you have a treasured Japanese maple in a UK garden, or a more vigorous species maple grown from seed, this guide takes you through the process step by step.
If your existing tree needs attention first, my Acer tree care guide covers the wider picture of feeding, watering, and siting.
Quick Comparison: Cuttings vs Seed
Before committing time to either method, it helps to know what each one can and cannot deliver.
| What You Want | Best Method | Realistic Success Rate | Time to a Usable Plant |
| An exact copy of a named cultivar (e.g. Bloodgood, Crimson Queen) | Cuttings | 20 to 40% for most cultivars; some as low as 5 to 10% | 1 to 2 years to a rooted, potted plant |
| A large number of trees from one source | Seed | 60 to 90% germination once dormancy is broken | 1 to 3 years to a plantable sapling |
| A quick, low-effort project | Seed | High | 1 season to germination |
| A tree genetically identical to the parent for grafting rootstock | Seed (species maples) | High | 1 to 2 years |
| Something to experiment with, accepting variation in leaf colour and form | Seed | High | 1 to 3 years |
Understanding Acer Propagation: Why Cuttings and Seed Behave So Differently
Acer, the maple genus, includes several hundred species, but most garden interest centres on Acer palmatum, the Japanese maple.
This one species has hundreds of named cultivars, and the difference between cuttings and seed matters a lot with this genus.
Named cultivars are almost always clones. They were propagated from a single original plant that showed a desirable mutation, such as an unusually deep red leaf colour or a weeping habit.
That trait is often the result of a single genetic event, so it is not reliably passed on through seed.
A seed collected from a Bloodgood Japanese maple will grow into a tree, but that tree will very likely have plain green leaves rather than Bloodgood’s deep crimson colour.
This is because the seed comes from sexual reproduction, combining genetic material from the parent tree and whatever pollinated it.
This is why nurseries propagate named Acer cultivars from cuttings, or by grafting onto seedling rootstock, and rarely use seed for named varieties.
For the home gardener, the choice should depend on your goal, not on which method sounds easier. If you want to reproduce a specific tree you already own, cuttings are the only realistic route, even though they are harder.
If you simply want more maples, and you’re happy to accept some variation, seed is by far the more forgiving option. For a broader look at how Acer trees develop over a full year, see my Acer tree care guide.
Propagating Acer Trees from Cuttings
Why Acer Cuttings Are Genuinely Difficult
It is worth being honest from the start. Acer palmatum is one of the harder garden trees to root from cuttings, which is exactly why grafted and tissue-cultured plants dominate the nursery trade.
The difficulty comes from two things. First, the tree produces relatively little natural rooting hormone compared with easier subjects like fuchsias or willows.
Second, there is a narrow window of stem maturity when cuttings will root at all.
A cutting taken too soft will simply rot before it roots. A cutting taken too woody will sit inert for months, lose vigour, and eventually die.
A success rate of 20 to 40 per cent is considered good for many cultivars. Some of the harder forms, especially the finely dissected dissectum types, can be lower still.
For a cultivar-specific view of what to expect, my Acer dissectum care guide covers the extra care these forms need.
None of this means the project is not worth trying. It just means you should take more cuttings than you think you need, and accept that some will fail.
Softwood Cuttings: The Highest Success Rate Method
Softwood cuttings come from the current season’s new growth. This growth is still soft, flexible, and usually a lighter green than older wood. In the UK, the best window is late May through to late June.
By then the new spring growth has fully extended, but it has not yet firmed up and turned woody.
The stem should bend without snapping, and it should still give slightly when pressed between finger and thumb.
Timing matters more here than with any other Acer propagation method. The window is genuinely narrow, often no more than two to three weeks.
- Choose a healthy, vigorous, non-flowering shoot from this season’s growth, ideally from a lower or side branch rather than the very top, as basal shoots tend to root more readily. Take the cutting early in the morning, when the stem is fully hydrated.
- Use a clean, sharp blade or secateurs to reduce the risk of crushing the stem tissue. Cut a length of about 10 to 15 centimetres, making the base cut just below a leaf node, where rooting hormone is naturally most concentrated.
- Remove the lower leaves, leaving only the top two or three. If those remaining leaves are large, cut each one roughly in half to reduce water loss while the cutting has no roots yet.
- Dip the cut base in a rooting hormone gel or powder made for softwood cuttings, tapping off any excess.
- Insert the cutting into a free-draining rooting medium, such as a fifty-fifty mix of perlite and peat-free multipurpose compost, to a depth of around 3 to 4 centimetres. Firm gently around the base and water thoroughly.
- Cover with a clear plastic bag, or place in a propagator with the vents closed. Softwood cuttings lose water very fast and need high humidity to survive.
- Position the cuttings in bright, indirect light. Never use direct sun, as it will overheat the enclosed environment and scorch the leaves.
- Aim for a temperature of 18 to 21 degrees Celsius. Bottom heat from a heated propagation mat noticeably speeds up rooting and improves success rate.
- Check the compost moisture every few days and mist if it starts to dry out, but avoid waterlogging, which will rot the base of the cutting before it can root.
Rooting typically takes four to eight weeks. A gentle tug test can help you check for resistance, but do this carefully so you do not disturb developing roots.
New leaf growth is a more reliable sign that rooting has worked.
Semi-Ripe Cuttings: A More Forgiving Alternative
Semi-ripe cuttings are taken later in the season. In the UK, this is typically late July through to September.
By then, the current year’s growth has started to firm at the base while the tip is still flexible and green.
This partially hardened wood is more resilient than softwood and tolerates a less controlled environment, though it generally roots somewhat more slowly.
- Choose a shoot from this season’s growth that snaps cleanly, with a slight heel of older bark still attached at the base, rather than bending limply.
- Cut a length of 10 to 15 centimetres, just below a node. Remove the lower leaves and reduce the size of any large remaining leaves.
- Consider a heel cutting, where a small strip of the previous year’s bark is pulled away with the cutting rather than cut cleanly across. The heel contains dormant buds and rooting tissue, and it can improve success.
- Dip the base in rooting hormone and insert it into the same free-draining perlite and compost mix used for softwood cuttings.
- Maintain humidity with a propagator or plastic bag. Semi-ripe cuttings tolerate slightly lower humidity than softwood, and bottom heat helps but is less essential.
Rooting for semi-ripe cuttings typically takes eight to twelve weeks. Because this happens later in the year, the rooted cuttings are usually overwintered in their first pot.
Keep them in a cold frame or unheated greenhouse to protect the still-developing roots through winter.
Hardwood Cuttings: The Slowest but Simplest Method
Hardwood cuttings are taken during the dormant season. In the UK, this runs from late autumn through to late winter, using fully mature wood from the previous season’s growth.
This is a good time to take a look at your tree’s overall shape too, and my guide on when and how to prune an Acer tree covers the same dormant window.
This method has the lowest success rate of the three for Acer palmatum, but it needs the least equipment and the least ongoing care.
There is no humidity control needed. You can simply insert the cuttings into a sheltered outdoor nursery bed, or a deep pot of gritty compost, and largely leave them alone.
- Select pencil-thickness stems from the previous season’s growth. Cut lengths of 20 to 25 centimetres, with a sloping cut at the top just above a bud and a straight cut at the base just below a bud.
- Dip the base in rooting hormone and insert it to two-thirds of its length into a free-draining mix of equal parts grit, compost, and sand.
- Use a sheltered outdoor bed or deep pots kept in a cold frame. Firm well and water once, then leave the cuttings largely undisturbed over winter.
- Check that frost has not lifted the cuttings, as this can break the developing root to soil contact. Gently firm them back into place if it has.
Hardwood cuttings root very slowly. Signs of success often do not appear until the following spring, or even the summer after that. Patience is essential with this method.
Aftercare for Rooted Acer Cuttings
Once roots are established, the transition to independent growth needs to happen gradually, whichever method you used.
Start by opening the propagator vents, or making a small hole in the plastic covering, for a few hours a day, gradually increasing this exposure over one to two weeks. This process is called hardening off.
Pot on into individual small pots, around 9 centimetres, using a free-draining, slightly acidic compost, and be careful not to damage the young, brittle root system during the move.
If you plan to keep the young tree in a container long term rather than planting it out, my guide to growing an Acer tree in a pot covers compost, feeding, and repotting.
Keep newly potted rooted cuttings somewhere sheltered, with bright but indirect light, for their first few months.
Protect them from frost through their first winter using a cold frame, unheated greenhouse, or sheltered spot against a house wall.
My Acer winter care and frost protection guide goes into more detail on this.
Rooted cuttings, especially from softwood, are not reliably hardy enough for a first winter fully exposed outdoors, and they benefit from protection until they are more established, usually after their second growing season.
| Do Not Discard Cuttings That Look Dormant A cutting that has not visibly rooted after eight to ten weeks is not necessarily dead. Gently scratch the stem with a fingernail. If it is still green and firm beneath the surface, keep caring for it. Some Acer cuttings, especially hardwood ones, take much longer than average to show signs of rooting. Discarding them too soon is one of the most common reasons gardeners think their success rate is lower than it really is. |
Growing an Acer Tree from Seed
Understanding Acer Seed: Samaras and Dormancy
Acer trees produce their seeds inside a distinctive winged structure called a samara.
Most people know these as helicopter seeds or whirlybirds, because of the way they spin as they fall. This spinning motion helps carry the seed away from the shade of the parent tree.
Each samara contains a single seed, and most Acer species produce them in pairs joined at the base. Seed drop and leaf drop are closely linked events in this genus.
If you want to understand the wider autumn picture on your own tree, see do Acer trees lose their leaves.
Here is the single most important fact about growing Acer from seed: fresh seed will not germinate readily on its own.
Acer seed has a built-in dormancy mechanism that stops the seed germinating right after falling in autumn, which would expose tender seedlings to winter cold.
Instead, the seed needs a period of cold, moist conditions to break this dormancy. This process is called cold stratification.
Skipping stratification is the single most common reason home-collected Acer seed fails to germinate. It causes far more failures than poor seed quality or incorrect sowing technique.
Collecting Acer Seed
Acer seed is ready to collect once the samaras turn from green to a papery brown or tan colour. They will also begin to dry and detach easily from the tree.
In the UK, this typically happens from September through to November, depending on the species and the season.
Collect samaras directly from the tree where possible, rather than from the ground, since freshly fallen seed is less likely to have been damaged by insects, mould, or excess moisture.
Test a small sample first. Cut a few seeds open with a sharp blade. A healthy, viable seed shows a firm, cream to pale green embryo filling the seed cavity.
An empty, discoloured, or shrivelled interior means the seed is not viable. Unfortunately, this is common in Acer and can affect a significant proportion of any seed crop.
Preparing Seed for Stratification
Remove the papery wing from each samara. It serves no purpose after collection, and removing it makes handling and storage much easier.
Soak the seed in water for 24 hours before stratification. This rehydrates the seed, and it also helps you spot non-viable, hollow seed, which will typically float, while viable seed sinks.
Cold Stratification: The Essential Step
Cold stratification mimics the natural winter conditions the seed would experience beneath its parent tree, and this is what triggers the internal chemical changes that allow germination.
- Mix the cleaned, soaked seed with a slightly damp medium. Vermiculite, perlite, or a fifty-fifty mix of peat-free compost and sand all work. Use just enough moisture that the mixture holds together when squeezed, but does not release free water.
- Place the mixture into a sealed plastic bag or lidded container and store it in the salad drawer of a domestic fridge, which typically holds a temperature of around 1 to 5 degrees Celsius, ideal for Acer stratification.
- Most Acer species, including Acer palmatum, need 90 to 120 days of cold stratification. Seed collected in October, and stratified promptly, will typically be ready to sow between late January and March.
- Check the bag every few weeks during stratification. Look for mould and gently rinse it off if it appears. Also look for seeds that have already split, or show a root emerging, known as radicle emergence. This means stratification has worked and the seed is ready to sow right away, even if the full stratification period is not finished.
Independent horticultural guidance from the RHS on propagation techniques broadly supports this approach for tree and shrub seed, confirming that cold, moist storage is what breaks dormancy for species that need it.
Sowing Stratified Acer Seed
Sow the seed promptly once stratification is complete. Germinated seed left too long in the fridge will develop weak, pale growth in the dark.
Fill trays or small pots with a free-draining, low-fertility seed compost, adding grit or perlite for extra drainage if you can.
Sow the seed at a depth of about 1 centimetre, covering lightly with compost or fine grit, which also helps suppress moss and liverwort on the surface of the pot.
Water gently but thoroughly. Place the trays somewhere bright but out of direct, intense sun, and keep the moisture consistent without waterlogging.
Aim for a temperature of around 15 to 20 degrees Celsius. Following successful stratification, germination typically happens within two to six weeks.
Some seed germinates erratically over a longer period, so do not discard the trays too early.
Aftercare for Acer Seedlings
Once seedlings produce their first true leaves, beyond the initial pair of seed leaves, or cotyledons, you can prick them out individually into small pots using a free-draining, slightly acidic compost.
Handle seedlings by their leaves, not their stems, since the stem is easily crushed and any damage there is usually fatal to the seedling.
Grow young Acer seedlings on in a sheltered spot with bright, indirect light for their first year. My Japanese maple light requirements guide covers how this changes as the tree matures.
Protect seedlings from strong direct sun, which can scorch the tender young leaves, and also from hard frost, as first-year seedlings are far more vulnerable to it than established trees.
Pot on as the roots fill each container, which usually happens once or twice in the first year.
From the second spring onwards, gradually introduce seedlings to more direct light and outdoor conditions.
Expect real variation among seedlings from the same seed batch. Leaf colour and eventual growth habit will differ, and for many growers, that variation is part of the appeal of raising Acer trees from seed.
Acer Propagation in the UK: Climate-Specific Notes
The UK’s cool, damp climate broadly suits Acer propagation, closely mirroring the conditions the genus experiences in much of its native range. Still, a few points are worth noting for UK growers.
The UK’s cooler summers mean the softwood cutting window can arrive slightly later than in warmer climates, sometimes not until late May, and it can also close abruptly if a sudden hot spell hardens the wood ahead of schedule.
Humidity control matters less here than in hotter, drier regions, thanks to the UK’s naturally humid climate.
Even so, a covered propagator or plastic bag is still essential for softwood cuttings, since UK ambient humidity, while higher than in many places, still is not enough on its own to stop a leafy, rootless cutting from wilting.
A domestic fridge works perfectly well for cold stratification in the UK.
Outdoor stratification in a sheltered, shaded cold frame is also a viable alternative, and UK winter temperatures in a sheltered spot usually stay within the ideal stratification range for long periods.
This method does carry a higher risk of loss to rodents, though, who happily eat stored Acer seed.
Named Japanese maple cultivars propagated from cuttings in the UK are usually potted on and grown under cover.
Keep them in a cold frame or unheated greenhouse for at least their first full winter, since UK winter waterlogging, combined with a newly developing, minimal root system, is a common cause of first-year losses.
If space is tight, it is worth planning ahead for where a mature tree will eventually go. My guide to the best Acer trees for small gardens is a useful reference once your propagated trees are ready to plant out.
Cuttings vs Seed: Full Comparison Table
| Factor | Cuttings | Seed |
| Genetic result | Identical to parent (clone) | Variable; does not come true for cultivars |
| Best for | Named cultivars, exact replication | Species maples, general propagation, rootstock |
| Success rate | 20 to 40% typical; some cultivars lower | 60 to 90% once dormancy is broken |
| Equipment needed | Propagator or plastic bag, rooting hormone, bottom heat (ideal) | Refrigerator or cold frame, seed trays |
| Skill level | Moderate to high | Low to moderate |
| Time to rooted/germinated plant | 4 to 12 weeks | 2 to 6 weeks after stratification completes |
| Time to a plantable tree | 1 to 2 years | 1 to 3 years |
| Main risk | Rot or failure to root before establishing | Failure to stratify adequately; non-viable seed |
| Seasonal window | Late May to June (softwood); July to Sept (semi-ripe); Nov to Feb (hardwood) | Collect Sept to Nov; sow Jan to March after stratification |
Frequently Asked Questions
Can I grow an exact copy of my named Japanese maple from seed?
No, not reliably. Named cultivars like Bloodgood, Crimson Queen, or Sango Kaku are clones.
They were originally propagated from a single tree that showed a distinctive trait, and that trait usually is not passed on consistently through seed.
A seed from a named cultivar will grow into a genuinely new, unique tree. It might be attractive in its own right, but it will not be identical to its parent.
Cuttings, or commercially grafted plants, are the only reliable way to get a genetic copy of a specific named cultivar.
Why did my Acer cuttings all fail?
A few things usually cause this. Taking the cutting at the wrong stage of maturity is common; too soft, and it rots, too woody, and it cannot root.
Not enough humidity around the leaves is another cause, as the cutting wilts and dies before roots can form.
Rooting medium that is too wet, causing basal rot, or too dry, preventing root growth, is a third. If an established tree in the garden is struggling rather than a cutting, my guide on what to do when an Acer tree is not growing covers the wider set of causes.
Even experienced propagators typically see success rates well under 50 per cent for Acer palmatum, so take a larger batch of cuttings than you need and accept some losses as normal.
Why won’t my Acer seeds germinate?
By far the most common reason is not enough cold stratification. Acer seed sown directly, without roughly 90 to 120 days of cold, moist storage, will typically fail to germinate, or it will germinate very erratically over a long, unpredictable period.
Non-viable seed is also common in Acer. It is worth testing a sample first, cutting a few seeds open to check for a firm, healthy embryo before committing a whole batch to stratification.
How long does an Acer tree take to grow from seed to a plantable size?
Most Acer species reach a plantable sapling size, roughly 30 to 60 centimetres, within two to three years from seed, given good growing conditions.
Named characteristics like strong autumn colour take much longer to fully show, often five to ten years.
Do I need rooting hormone for Acer cuttings?
It is not strictly essential, but it meaningfully improves both the speed and success rate of rooting, especially in a genus that is already reluctant to produce roots.
Using it is recommended, particularly for softwood and semi-ripe cuttings.
Why do my seedlings or young cuttings have yellow or brown leaves?
This is usually a sign of a care issue rather than a propagation failure in progress, most often too much direct sun, inconsistent watering, or a cold draught on a young plant.
My guides on Acer leaves turning brown and Acer tree leaves turning yellow walk through the most likely causes and how to fix each one.
Key Takeaways
| At a Glance Cuttings produce an exact genetic copy; seed does not. For named cultivars, cuttings are the only way to reproduce the parent tree accurately. Seed-grown plants will vary. Acer cuttings have a genuinely modest success rate. Twenty to forty per cent is typical for many cultivars. Take more cuttings than you think you need. Timing is critical for cuttings. Softwood in late May to June, semi-ripe in July to September, hardwood from November to February. Each has a different technique and success rate. Fresh Acer seed will not germinate without stratification. A cold, moist period of 90 to 120 days is essential to break natural dormancy before sowing. Seed is the easier, more reliable, but less predictable route. Germination rates are high once dormancy is broken, but the resulting trees will show genetic variation. Aftercare determines long-term survival for both methods. Gradual hardening off, frost protection in the first winter, and free-draining, slightly acidic compost matter regardless of propagation method. |
Final Thoughts
Propagating an Acer tree rewards patience more than any single technique or piece of equipment, whether you choose cuttings or seed.
Cuttings ask for careful timing, the right humidity, and a willingness to accept a failure rate that would put most people off.
But they deliver something no other method can: a genuine, identical copy of the tree you started with.
Seed asks for far less skill, but it does need the discipline of proper cold stratification. Without it, even perfectly viable seed will simply sit inert.
Whichever route you choose, do not give up on material that has not shown visible results yet. Acer is a genus that rewards a grower who is willing to wait, more than most.
Once your new trees are established, my Acer tree care guide and when and how to prune an Acer tree will help you keep them healthy for years to come.
Mariel is a plant enthusiast and writer based in the UK with a passion for houseplants and indoor growing.
She has spent the last few years building an ever-growing collection of indoor plants and learning the hard way which ones will survive her busy schedule.
At Bean Growing she writes about houseplant care, common plant problems, and outdoor gardening.