
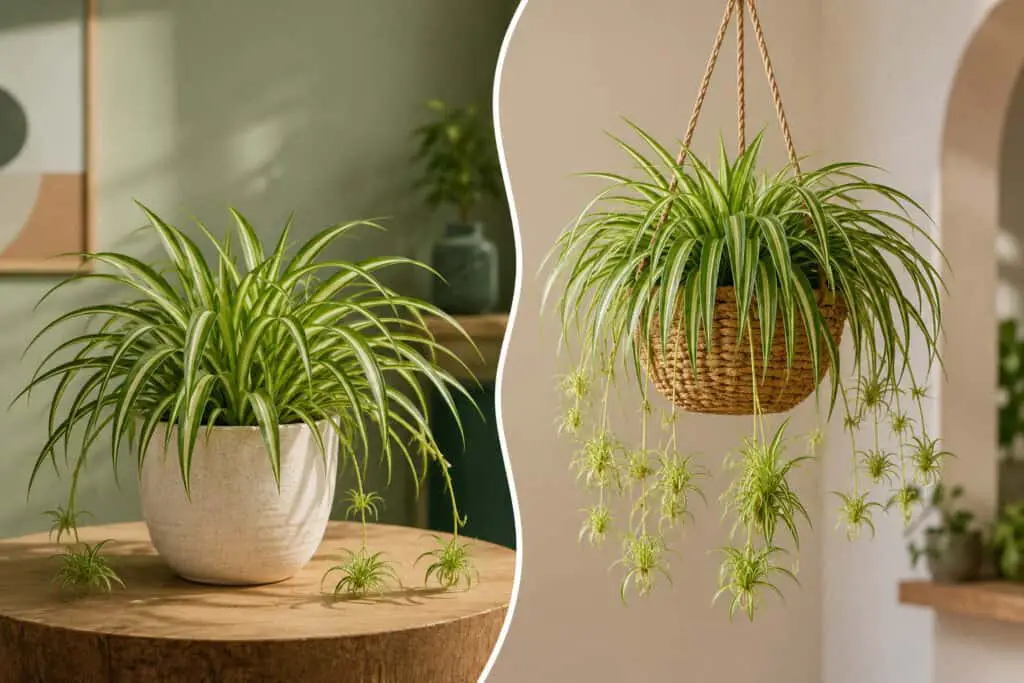
Spider plants (Chlorophytum comosum) grow well in both standard pots and hanging baskets, but each setup changes how you water, how often you repot, and how freely the plant produces babies.
- Pot placement gives roots more vertical depth and stays easier to water.
- Hanging setups show off the cascading leaves and stolons naturally but dry out faster and demand more thought around watering logistics.
- Drainage is non-negotiable in either case.
You buy a spider plant, stick it on a shelf in a regular pot, and within a month the long leaves are snapping where they bend over the rim.
Or you hang it near a bright window and find yourself dragging out a step stool every few days just to check the soil.
Neither situation is a plant problem. Both are a setup problem.
The question of pot versus hanging basket sounds simple, but it actually affects how frequently you need to water, how fast the soil dries, whether the stolons can produce babies freely, and even how quickly your roots fill the container.
Getting this decision right early saves a lot of frustration.
This guide breaks down exactly how each setup affects Chlorophytum comosum care, where the commonly repeated advice falls short, and which option genuinely suits your space, your schedule, and the stage your plant is at.
For a full overview of everyday requirements, our spider plant care guide is a useful companion to this one.
What Actually Changes Between a Pot and a Hanging Basket
Most guides treat pot versus hanging as a purely aesthetic choice. It is not.
The physical environment your spider plant sits in changes three things in practice: soil moisture dynamics, stolon behaviour, and how you interact with the plant at watering time.
Pots placed on a shelf or windowsill sit in still air. Soil dries more slowly and evenly from the top.
You can tip the pot to check root density, lift it easily for drainage checks, and water it without removing it from its spot.
Hanging baskets sit in warmer, moving air closer to the ceiling. Soil dries faster, sometimes significantly faster in summer or in heated rooms.
You also have to manage drainage actively, because watering a hanging basket in place creates drips and puddles below.
A spider plant in a well-positioned hanging basket does look genuinely stunning once the stolons trail down freely, but that visual payoff comes with a more hands-on maintenance routine.
Root Structure and Why It Matters for Container Choice
Spider plants grow fleshy, tuberous roots that store water and expand laterally rather than deeply. These are thick, off-white to pale yellow structures that feel almost rubbery when healthy.
They fill a pot outward rather than downward, which means shallow hanging baskets can actually suit their root habit fairly well, as long as the basket has adequate depth.
The problem with very shallow basket designs, sometimes no deeper than four or five inches, is that the tuberous roots hit the container wall quickly and begin circling.
Once roots circle in a confined space they can push the crown of the plant upward, and you’ll see the base of the leaf cluster starting to lift above the soil line.
That’s a visible cue that the root mass is under pressure, the same signal covered in more depth in our guide to spider plants that are pot bound.
A standard terracotta or plastic pot with a depth of six inches or more gives those roots genuine room to develop without hitting the sides prematurely.
For hanging setups, look for baskets that are at least eight to ten inches in diameter and have comparable depth, not the decorative wide-and-shallow designs that look appealing but restrict root growth within a single growing season.
If you’re weighing up growing media rather than soil, growing a spider plant in LECA is worth a look too, since it changes root behaviour again.
Tip: Read the Root Signal Before You Repot
When roots start pushing up through the soil surface and you can see pale, thick tubers crowding the crown, that’s the clearest sign a size-up is overdue.
In a hanging basket this can happen faster than in a standard pot because many baskets are shallower.
Go up only one to two inches in diameter when you repot, a pot that’s too large holds excess moisture and increases root rot risk significantly.
Our step-by-step guide on how and when to repot a spider plant covers the full process, including how to handle the root ball without damaging the tubers.
How Each Setup Affects Watering
This is where the practical gap between pot and hanging basket is most noticeable, and where the most beginner mistakes happen.
For the fundamentals of frequency and technique, see our dedicated guide on how to water a spider plant.
Watering a Spider Plant in a Standard Pot
In a pot on a shelf or tabletop, you water in place by saturating the soil and letting excess drain through the drainage holes into a saucer.
The key step most guides skip: empty the saucer after thirty minutes.
Spider plants sitting in pooled water at the base develop root rot from the bottom up, and you often won’t notice until the crown starts to look mushy and the outer leaves yellow at the base rather than at the tips, one of the clearer overwatering signs in spider plants to watch for.
Soil dries from the top in a standard pot. Check the top inch with your finger. When it feels dry and pulls slightly away from the pot edge, water thoroughly.
In a six-inch pot in average indoor conditions, this is typically every seven to ten days in spring and summer, and every twelve to fourteen days in winter.
Watering a Spider Plant in a Hanging Basket
Hanging baskets dry out faster because warm air rises and the basket sits in the warmest, driest zone of the room.
In summer or near heating vents, you may find the top inch drying out in four or five days rather than seven.
The practical challenge is drainage. You cannot simply water a hanging basket in place without drips landing on whatever is below.
The most reliable approach is to take the basket down and carry it to a sink or bathtub, water it thoroughly until water runs freely from the drainage holes, let it drain completely for several minutes, and then rehang it.
This takes two or three minutes but it protects your floors and ensures even saturation.
Skipping the thorough-soak step is a common mistake.
Giving a hanging basket just a small amount of water from above without soaking through leads to dry pockets in the lower root zone where the tuberous roots sit.
Over time the roots in those dry zones begin to shrivel and turn tan or brown, and the leaves above them yellow and thin out without any obvious overwatering signs.
Tip: Tap Water and Brown Tips
Spider plants are sensitive to fluoride in tap water. Brown leaf tips are one of the most common complaints, and fluoride build-up in the soil is frequently the cause rather than watering frequency.
Switching to filtered water or letting tap water sit uncovered overnight before using it often resolves the problem within a few weeks of new growth.
Our full breakdown of spider plant brown tips covers the other causes worth ruling out.
This applies equally to pot and hanging basket setups.
Light Requirements: How Your Placement Shifts the Balance
Spider plants thrive in bright, indirect light but tolerate lower light conditions reasonably well. See our notes on spider plants in low light if that’s your main constraint.
What changes between a pot on a shelf and a hanging basket is where in the room the plant ends up, and that affects light exposure more than the container itself.
A pot on a shelf near a north or east-facing window sits in stable, moderate indirect light. This is actually the ideal position for consistent growth and good variegation.
The white or cream stripes in varieties like ‘Vittatum’ and ‘Variegatum’ stay vivid in bright indirect light.
Our guide to the different types of spider plants covers how each cultivar’s variegation responds to light.
In low light, the same stripes fade toward pale green and the plant produces fewer stolons; if you’re already seeing this, our article on spider plants losing variegation explains how to reverse it.
A hanging basket near a south or west-facing window sits higher in the room and can receive more intense afternoon light than a shelf plant at the same window.
Watch for bleaching: if the leaves start to develop pale, washed-out patches or tan streaks along their length, the basket is too close to direct sun.
Move it back a foot or hang a sheer curtain to filter the light. For more detail on matching position to light levels, see our full spider plant light requirements guide.
One advantage of hanging position: stolons that trail down from a basket catch ambient light along their full length, which encourages the developing plantlets to grow more vigorously.
When stolons are coiled on the soil surface of a standard pot, the plantlets at the tips often dry out before they establish because they sit in the warmest microclimate near the pot rim.
Stolon and Pup Production: The Biggest Practical Difference
This is the area where hanging baskets have a genuine, functional advantage over standard pots, and where most guides either oversimplify or miss the underlying reason entirely.
Spider plants produce long, wiry stolons from the crown. These stolons grow outward and downward, with plantlets (commonly called pups or spiderettes) forming at intervals along their length.
In a hanging basket, the stolons trail freely downward in open air.
They receive light, the plantlets develop sturdy pre-root structures called aerial roots that you can see as small white nubs at the base of each pup, and the whole display looks like the plant it naturally wants to be.
In a standard pot on a shelf, stolons eventually reach the pot rim and either drape over the side or curl back across the soil.
Stolons coiled on the soil surface can trap moisture against the crown if the plant is watered carelessly, which increases the risk of crown rot.
Plantlets at the tips of soil-touching stolons sometimes root themselves uninvited into the potting mix, which can crowd the mother plant.
If your goal is to propagate pups regularly, a hanging setup genuinely makes the process easier.
You can see developing plantlets clearly, assess when the small white nubs at their base are long enough to pot up (typically when they reach about a quarter inch), and snip and propagate without disturbing the mother plant.
For the two main methods, see our guides on how to propagate a spider plant and spider plant propagation in water.
Tip: Do Not Leave Mature Pups on the Stolons Too Long
Once a pup has developed visible, substantial root nubs and begins to look like a miniature plant with its own leaf cluster, it’s drawing energy from the mother plant.
Leaving ten or fifteen mature pups attached at once visibly slows growth in the parent and reduces new stolon production.
Snip pups once their root nubs reach about a quarter inch for propagation, or remove the stolon entirely if you’re not propagating.
If your plant isn’t sending out stolons at all, our troubleshooting guide on why a spider plant isn’t growing walks through the most likely causes.
Pot vs Hanging Basket: Side-by-Side Comparison
| Factor | Standard Pot | Hanging Basket |
|---|---|---|
| Soil drying speed | Slower, more even | Faster, especially in warm rooms |
| Watering method | Water in place, empty saucer | Take down, soak in sink, rehang |
| Root depth available | Good in most standard pots | Varies – check basket depth before buying |
| Stolon behaviour | Coils or drapes over rim | Trails freely downward |
| Pup visibility | Harder to monitor | Easy to check and propagate |
| Light exposure | Stable, depends on shelf height | Often higher in room, warmer light zone |
| Repotting frequency | Every 1 to 2 years typically | Can be needed more often in shallow baskets |
| Watering convenience | Simple, water in place | Requires taking down and returning |
| Visual display | Tidy on shelves and tabletops | Dramatic, full cascading growth |
| Best for | Beginners, low-maintenance setups | Active growers focused on pup production |
Choosing the Right Container Size for Either Setup
Container size is one of the most commonly misunderstood parts of spider plant care, and the advice to “choose a pot that gives the roots room to grow” often pushes beginners toward pots that are too large.
Spider plants actually perform better when slightly root-bound. A snug root system is one of the triggers for stolon and pup production.
A plant in a pot two or three sizes too large will push all its energy into root development before it produces stolons.
The soil in an oversized pot also stays wet far longer than the plant needs, which is the most direct route to root rot.
For a standard pot, choose one that’s only one to two inches larger in diameter than the current root ball. If the plant is in a four-inch nursery pot, move it to a five or six-inch pot, not an eight-inch pot.
For hanging baskets, an eight to ten-inch diameter basket suits a mature plant with good stolon production. Smaller baskets in the six-inch range work for young plants or freshly potted pups.
One detail that matters more in hanging baskets than in standard pots: check that the basket has actual drainage holes, not just a decorative liner that creates a false bottom.
Many attractive woven or ceramic hanging baskets have no drainage at all, and planting directly into one without a plastic liner insert will kill the plant within a few weeks.
Soil and Fertiliser: What Works in Both Setups
Spider plants are not fussy about soil as long as it drains well. A mix of two parts standard potting soil, one part perlite, and one part coco coir or loam works reliably in both pots and hanging baskets.
See our full best soil for a spider plant guide for ratios and alternatives.
Avoid potting mixes that contain significant amounts of added fertiliser with fluoride, as this mineral accumulates in the soil over time and causes the brown leaf tips that are the most common cosmetic complaint about spider plants.
Fertilise every four to six weeks from spring through early fall using a balanced liquid fertiliser diluted to half the recommended strength.
Full-strength fertiliser causes salt build-up in the soil, which shows up as white crusting on the soil surface and around the drainage holes, and eventually as brown, crisping leaf tips that start at the outer edges and work inward.
Our guide on how to fertilise a spider plant has a full seasonal schedule.
Stop fertilising in fall and don’t restart until you see active new growth in early spring.
Spider plants slow down significantly in winter and cannot process nutrients effectively during dormancy.
Fertilising a dormant plant pushes salts into the root zone without the plant benefiting from them.
UK Reader Note: Seasonal Timing
UK growers should align feeding with the RHS growing calendar rather than US spring timing. Begin fertilising in mid-March to April when daylight hours increase noticeably, and stop by September.
Spider plants are listed by the RHS as hardiness rating H1b (minimum 10°C), which corresponds to USDA Zone 9b to 10.
They cannot tolerate outdoor UK winters but grow year-round as houseplants throughout the country.
If you’re tempted to move a plant outside for summer, our guide on whether spider plants can live outdoors covers what to check first.
Troubleshooting Common Problems
Most spider plant problems trace back to watering or light rather than pests or disease. The setup, pot versus hanging, changes which problems are more likely.
Brown Leaf Tips
The most common complaint. Causes include fluoride in tap water, low humidity (below 40 percent), over-fertilising, and inconsistent watering.
In hanging baskets, inconsistent watering is the more frequent cause because the partial-watering habit mentioned above leads to dry lower root zones.
Switch to filtered water, flush the soil thoroughly every few months to clear salt build-up, and make sure every watering is a complete soak rather than a surface dampening.
Yellowing Leaves
Yellow leaves starting at the base of the crown usually signal overwatering or water sitting in a saucer. Yellow leaves across the whole plant with a general washed-out look often point to low light.
In pots, check that the saucer isn’t trapping water. In hanging baskets, check that the liner or basket bottom isn’t retaining moisture without draining fully.
Our guide on spider plant leaves turning yellow breaks down each pattern in more detail.
No Pups or Stolons
If the plant is growing well but producing no stolons, the three most likely causes are too much fertiliser (excess nitrogen pushes leaf growth at the expense of reproductive growth), not enough light, or a pot that’s too large.
A snug pot in bright indirect light with minimal feeding is the most reliable way to trigger stolon production.
If you’ve moved to a hanging position hoping to encourage pups and the plant still doesn’t produce them, check light levels and reduce the pot size before trying anything else.
Root Rot
Root rot presents as soft, tan or brown roots with a slightly sour smell when you unpot the plant. Healthy roots are firm, white to pale yellow, and rubbery.
If you see brown mush at the root tips or at the tuber surface, remove all affected tissue with clean scissors, let the roots air dry for an hour, and repot into fresh, barely-moist soil.
Root rot in hanging baskets usually results from a basket with poor drainage or from taking the basket down to water and not allowing it to drain fully before rehanging.
Stolons Drying at the Tips
In standard pots where stolons drape over the rim and hang in dry air away from the foliage, the stolon tips and the plantlets on them sometimes dry out before developing viable root nubs.
This is more common in low-humidity rooms.
Moving to a hanging setup where the stolons are in the ambient room air rather than against a dry pot rim usually resolves it.
Pests to Rule Out
If leaves are discoloured or sticky despite good watering and light, check the undersides of the leaves and along the stolons for pests before assuming it’s a container issue.
Our comparison of spider mites vs mealybugs on spider plants helps you tell the two apart, since the treatment differs.
| Problem | Likely Cause | How to Confirm | Solution |
|---|---|---|---|
| Brown leaf tips | Fluoride, salt build-up, dry air | White soil crust, crisp brown edges only | Filtered water, flush soil, raise humidity |
| Yellow lower leaves | Overwatering or standing water | Soft crown, wet saucer | Improve drainage, empty saucer, reduce watering |
| No stolon production | Too much fertiliser or pot too large | Lush leaves, no trails at all | Reduce feed, size down pot, increase light |
| Root rot | Consistently wet soil | Brown, mushy roots with sour smell | Trim rot, air-dry, repot in fresh dry mix |
| Stolon tips drying | Low humidity, poor air around rim | Tips shrivelling before pups root | Switch to hanging setup or raise humidity |
| Pale, faded variegation | Too little light | Stripes fading to uniform pale green | Move to brighter indirect light |
The Setup That Works Best and When to Switch
If you’re a beginner or you want a low-maintenance plant that you water in place and largely ignore between waterings, a standard pot on a bright shelf is the right choice.
The watering rhythm is more forgiving, the setup doesn’t require you to manage drainage logistics, and the plant will still grow well and produce pups once it settles in.
If you’re past the beginner stage, your plant is mature and producing stolons actively, you have a genuinely bright spot near a window, and you want to display the plant the way it actually wants to grow, a hanging basket is worth the additional maintenance.
The plant looks better, the pups develop more reliably, and propagation becomes straightforward.
The mistake most growers make is hanging a young, small, or newly-potted plant before it’s ready.
A small plant in a large hanging basket looks lost rather than dramatic, the leaves don’t reach the rim, the soil stays wet longer than it should in a container that size, and the plant has no visual impact.
Wait until the plant has at least six to eight inches of leaf length and is beginning to push stolons before moving it to a hanging position.
As a rough guide, see how fast spider plants typically grow and how big a mature spider plant gets so you know what to expect.
If you’re deciding between the two and unsure, start in a six-inch plastic nursery pot placed inside a macrame hanger.
This gives you the hanging aesthetic without committing to a dedicated hanging basket.
When the plant outgrows the nursery pot, you can move it into an actual hanging basket at the right size for the root ball.
Frequently Asked Questions
Do spider plants grow better in pots or hanging baskets?
Neither is strictly better for growth. Spider plants grow well in both setups if the drainage is adequate and the light and watering are managed correctly.
The practical difference is in maintenance and display. Standard pots are easier to water and monitor.
Hanging baskets allow the stolons to trail freely, which makes pup production more visible and easier to manage.
For most beginners, starting in a standard pot and moving to a hanging basket once the plant is established and producing stolons gives the best results.
How often do you water a spider plant in a hanging basket?
Hanging baskets dry out faster than standard pots because they sit in warmer, drier air near the ceiling.
In spring and summer you may need to water every four to six days rather than every seven to ten.
Check by inserting a finger into the top inch of soil. When it feels dry, water thoroughly by taking the basket to a sink, soaking the soil until water drains freely from the bottom, allowing it to drain fully for a few minutes, and then rehanging.
In winter, watering frequency drops to every ten to fourteen days or even longer depending on how warm your home stays.
What kind of pot is best for spider plants?
A pot with drainage holes, a depth-to-width ratio that gives the tuberous roots room to expand laterally, and a size that’s only one to two inches larger than the current root ball.
Plastic pots are practical because they’re lightweight and retain moisture slightly better than terracotta in homes with low humidity.
Terracotta breathes well but dries faster, which can be an advantage in humid climates but a disadvantage in dry ones.
Avoid glazed ceramic pots without drainage holes. For hanging baskets specifically, look for designs at least eight inches in diameter with genuine drainage holes rather than decorative liners.
Do spider plants like to be root-bound?
Yes, to a point. Being slightly root-bound encourages stolon and pup production because the plant shifts energy from root expansion toward reproduction.
However, severely root-bound spider plants show visible stress: roots push above the soil surface, the pot may crack or bulge, and the plant dries out within a day or two of watering.
When you see firm white tubers mounding above the soil or roots growing out of the drainage holes and circling the base, it’s time to size up by one to two inches.
Going larger than that risks root rot from excess retained moisture. Our dedicated guide on spider plants and being pot bound covers the full range of warning signs.
Why is my hanging spider plant not producing babies?
The three most common causes are insufficient light, too much fertiliser, or a pot that’s too large relative to the root ball.
Spider plants need bright indirect light to produce stolons reliably. In dim conditions the plant focuses on maintaining its leaves rather than reproducing.
Excess nitrogen from over-fertilising pushes the same energy toward foliage. If the plant is in a large container with loose, wet soil, it will spend its resources expanding its root system.
Move the plant to a brighter spot, reduce or stop fertilising for a full growing season, and consider whether the basket is proportionate to the root ball.
Can you put a spider plant in a pot without drainage holes?
Technically yes, but the risk of root rot rises significantly and most spider plants grown this way develop problems within a few months.
Spider plants have fleshy tuberous roots that store water, which means they’re already carrying moisture reserves internally.
Sitting in a waterlogged pot on top of that creates anaerobic conditions around the roots.
If your only option is a pot without drainage holes, use the nursery-pot-inside-a-decorative-pot approach: plant into a plastic nursery pot with drainage holes, water it in the sink until it drains, and then place the nursery pot inside the decorative container.
Lift it out to water and drain each time.
How do you hang a spider plant without it dying?
Position the basket in bright indirect light at a height you can reach comfortably without a step stool.
The most common mistake with hanging spider plants is placing them too high, which makes watering inconvenient, leads to irregular watering, and often results in the plant being under-watered over time.
Hang at a height where you can easily touch the soil without stretching. Water by taking the basket down to a sink every time rather than attempting to water in place.
Make sure the basket is firmly supported: a mature spider plant with a full root ball and several trailing stolons can weigh several pounds when wet, and failing hooks are a genuine safety concern.
Is it normal for spider plant leaves to droop in a hanging basket?
Some drooping is normal and part of the plant’s natural arching habit. The leaves arch outward and downward from the crown, which is how the plant naturally grows.
If the drooping is more severe than usual, leaves are limp rather than just arching, and the soil is dry, the plant needs water.
And if the soil is wet and the leaves are limp and slightly yellowed, the problem is overwatering.
In hanging baskets specifically, severe drooping with wet soil often means the basket is not draining properly, and water is pooling around the roots. See our full guide on spider plant leaves drooping for a complete diagnostic checklist.
Key Takeaways
- Check your basket depth before buying. Hanging baskets shallower than six inches restrict tuberous root development faster than standard pots.
- Always take a hanging basket down to water it. Partial surface watering leaves dry pockets in the lower root zone and causes slow decline.
- Empty the saucer under a standard pot thirty minutes after watering. Sitting water at the base causes root rot from the bottom up, and you often won’t see it until the crown is already affected.
- Hang only a mature plant. A young or small plant in a large hanging basket won’t display well, will stay too wet, and won’t produce the cascading effect you’re aiming for.
- A snug pot triggers pup production. If your plant is growing leaves but producing no stolons, the pot may be too large or the fertiliser too strong.
- Use filtered water or overnight-rested tap water to prevent fluoride-related brown tips in both pot and hanging setups.
- Remove mature pups once their root nubs reach a quarter inch. Leaving too many attached drains the mother plant and slows new stolon growth.
Which Setup Is Right for You
The broken leaves and the awkward step stool situations that brought you here are solvable, and the solution is usually simpler than it looks.
A spider plant in the right container for its current size, positioned at a height you can actually reach, and watered all the way through every time it needs it will reward you with fast growth and more pups than you know what to do with.
The pot-versus-hanging decision matters more than most guides suggest, but it’s not irreversible. Start in a standard pot if you’re unsure.
Watch how the plant grows, see how quickly your soil dries, and observe where the stolons want to go.
When the plant is ready for a hanging setup, you’ll know because it will start looking crowded and trailing despite your best efforts to keep it tidy.
That’s usually the right time to move it up and let it do what it’s been trying to do all along.
What’s Next
Take a single mature pup from your spider plant once its root nubs reach a quarter inch and pot it into a four-inch container with well-draining soil.
Water it lightly, keep it in bright indirect light, and watch it establish over the next two to three weeks.
That first successful propagation is the most practical way to understand how the root structure and watering needs of this plant actually work, and you end up with a second plant in the process.
For everything else on keeping your collection thriving long-term, our spider plant care hub rounds up all our guides in one place.
Warning: Toxicity Information
Spider plants are considered non-toxic to humans and are listed as safe for cats and dogs by the ASPCA.
However, cats are attracted to the leaves and may chew on them.
Ingestion can cause mild stomach upset, vomiting, or loose stools in pets due to mildly hallucinogenic compounds related to opioids.
The effect is mild and not life-threatening, but placement out of reach of cats is recommended, which is one practical advantage of a well-positioned hanging basket.
See our notes on spider plants and air-purifying benefits for more on why they’re such a popular pet-friendly houseplant choice.
Mariel is a plant enthusiast and writer based in the UK with a passion for houseplants and indoor growing.
She has spent the last few years building an ever-growing collection of indoor plants and learning the hard way which ones will survive her busy schedule.
At Bean Growing she writes about houseplant care, common plant problems, and outdoor gardening.